Vista :How to Log on automatically

The procedure for automatically logging on to a default user account is essentially the same in Vista as it is in XP. First, the obligatory caveats and warnings:

Don’t do this if your system contains confidential data and is physically insecure. It’s a very bad idea to enable auto-logon on a notebook, for instance, because anyone who walks away with the notebook can get to its contents just by turning it on. The same is true if your system is in a location that can’t be locked up, such as a cubicle in an office bullpen. A passerby who wants to break into your computer only has to hit the power switch and wait for your system to restart and log on automatically to your account.

Also, don’t follow the instructions from some older Windows versions to enter your default password in the Registry. That option works but leaves your logon password exposed in clear text where anyone can find it. The option described here saves this value as an encrypted LSA secret, which is many times more secure.

As long as you understand and accept the risks, here’s how to enable auto-logon (these steps work identically in all Vista editions, including Home Basic and Home Premium). These instructions assume you are using a workgroup configuration and not logging on to a Windows domain:

1. From an account in the Administrators group, click Start. In the search box, type netplwiz and press Enter. This opens the Advanced User Accounts Control Panel shown here. (Update: If you’re trying to accomplish this in Windows XP, click Start, Run, and type control userpasswords2 in the Open box.)

Auto logon to Vista

2. Clear the check box to the left of Users must enter a user name and password to use this computer and then click Apply.

3. In the Automatically Log On dialog box, enter the user name assigned to the account you want to Windows to use each time you start up. Enter the password in both dialog boxes.

Auto logon to Vista step 2

4. Click OK to save your changes.

Now restart your system. You should bypass the logon screen and go straight to your desktop, just as you did in XP.

For a little more control over the autologon process, including the ability to set up Autologon for a limited number of sessions, download the Autologon.exe command line utility, created by Microsoft developer Andrew Jennings. Usage instructions and some interesting comments are available in this post on the Microsoft Shell Blog


Using MSCONFIG to Change the Programs Starting Automatically.

You can now use the MSCONFIG.EXE that comes with Windows XP.
Download the one from the full release product(64K)

It also lets you change the Services and BOOT.INI file as well.

If you like to use MSCONFIG from Windows 98, you can still use it with Windows 2000.

Just copy the file to a place in your path (e.g. \WINNT)
You will get an error about a file Regenv32.exe. It will work fine without it.

Increasing File System Caching

To increase the amount of memory Windows will save for locked I/O operations:

Start Regedit
Go to HKEY_LOCAL_MACHINE\SYSTEM\CurrentControlSet\Contro l\Session Manager\Memory Management
Edit the key IoPageLockLimit
4096 - 32megs of memory or less
8192 - 32+ megs of memory
16384 - 64+ megs of memory
32768 - 128+ megs of memory
65536 - 256+ megs of memory


Increasing System Performance

If you have 512 megs or more of memory, you can increase system performance
by having the core system kept in memory.

Start Regedit
Go to HKEY_LOCAL_MACHINE\SYSTEM\CurrentControlSet\Contro l\Session Manager\Memory Management\DisablePagingExecutive
Set the value to be 1
Reboot the computer


Disabling Dr. Watson

If you want to disable Dr. Watson program errors from generating log files:

Start Regedit
Go to HKEY_LOCAL_MACHINE / SOFTWARE \ Microsoft \ Windows NT \ CurrentVersion\ AeDebug
Set the string Auto=0
To re-enable it, run drwtsn32 -i
Note: If you do want to use Dr. Watson, you can change the default settings by running drwtsn32


Enabling CD AutoRun

To enable CD's automatically running when you insert them:

Start Regedit
Go to HKEY_LOCAL_MACHINE \ SYSTEM \ CurrentControlSet \ Services \ CD Rom
Make sure the key reads Autorun=1

Starting Programs Automatically at Each Command Prompt

If you want to start a program (like DOSKEY) or set an environment variable each time you open a command prompt:

Start Regedit
Go to HKEY_CURRENT_USER\Software\Microsoft\Command Processor
Create a String key called Autorun
Give it the value of the command you want to run
Multiple commands need to be separated by a double ampersand (&&)


Renaming the My Computer Icon

To rename the My Computer icon to the name of the user that is logged on:

Start Regedit
Go to HKEY_CLASSES_ROOT\CLSID\{20D04FE0-3AEA-1069-A2D8-08002B30309D}
Change the "My Computer" at end of @C:\WINNT\system32\shell32.dll,-9216@1033,My Computer
Press the F5 key to refresh the desktop and the new name will show up.

Quick Windows2000 Shutdown/Restart

To do a quick shutdown of Windows2000:

Press Ctrl-Alt-Delete
Hold the Control key while you click on the Shutdown button

A warning box will come up stating:
"If you continue, your machine will reboot and any unsaved data will be lost. Use only as a last resort."


Fix Browsing Delay

If you experience a 30 second or so delay when browsing to Windows98 or WindowsME computers, delete the following registry key on the Windows2000 computer.

HKEY_LOCAL_MACHINE / Software / Microsoft / Windows / CurrentVersion / Explorer / RemoteComputer / NameSpace {D6277990-4C6A-11CF-8D87-00AA0060F5BF}


How to change the size of the virtual memory paging file

1) Open System in Control Panel.

2) On the Advanced tab, click Performance Options, and under Virtual memory, click Change.

3) In the Drive list, click the drive that contains the paging fileyou want to change.

4) Under Paging file size for selected drive, type a new paging file size in megabytes in the Initial size (MB) or Maximum size (MB) box, and then click Set.

Services You Can Disable, XP users

There are quite a few services you can disable from starting automatically.
This would be to speed up your boot time and free resources.
They are only suggestions so I suggestion you read the description of each one when you run Services
and that you turn them off one at a time.

Some possibilities are:
Alerter - Sends alert messages to specified users that are connected to the server computer.

Application Management - Allows software to tap directly into the Add/Remove Programs feature via the Windows Installer technology.

Background Intelligent Transfer Service - The Background Intelligent Transfer service is used by programs (such as Windows AutoUpdate) to download files by using spare bandwidth.

Clipbook - ClipBook permits you to cut and paste text and graphics over the network.
Error Reporting Service - Allows applications to send error reports to m*cro$oft in the event of an application fault.

Fast User Switching - Windows XP allows users to switch quickly between accounts, without requiring them to log off.

Help and Support - Allows the XP Built-in Help and Support Center to run.

IMAPI CD-Burning COM Service - You don't need this if you have other software to create CDs.

Indexing Service - Indexes contents and properties of files on local and remote computers; provides rapid access to files through flexible querying language.

IP SEC - Manages IP security policy and starts the ISAKMP/Oakley (IKE) and the IP security driver. If you are not on a domain, you likely don't need this running.

Messenger - Transmits net send and Alerter service messages between clients and servers. This is how a lot of pop-up windows start appearing on your desktop.

Net Logon - Supports pass-through authentication of account logon events for computers in a domain. If you are not on a domain, you don't need this running

Network DDE - Provides network transport and security for Dynamic Data Exchange (DDE) for programs running on the same computer or on different computers.

NT LM Security Support Provider - Provides security to remote procedure call (RPC) programs that use transports other than named pipes.

Performance Logs and Alerts - Collects performance data from local or remote computers based on preconfigured schedule parameters, then writes the data to a log or triggers an alert. If you don't need to monitor your performance logs, then you don't need this service.

Portable Media Serial Number - Retrieves the serial number of any portable music player connected to your computer

QOS RSVP - Provides network signaling and local traffic control setup functionality for QoS-aware programs and control applets.

Remote Desktop Help Session Manager - Manages and controls Remote Assistance. If you are not using Remote Desktop you don't need this service.

Remote Registry - Enables remote users to modify registry settings on this computer.

Routing & Remote Access - Offers routing services to businesses in local area and wide area network environments. Allows dial-in access.

Secondary Login - Enables starting processes under alternate credentials. This is what allows you to run an application as another user.

Smart Card - Manages access to smart cards read by this computer.

Smart Card Helper - Enables support for legacy non-plug and play smart-card readers used by this computer.

SSDP Discovery Service - Enables discovery of UPnP devices on your home network.

TCP/IP NetBIOS Helper - Enables support for NetBIOS over TCP/IP (NetBT) service and NetBIOS name resolution. This should not be needed in today's network environment.

Telnet - Enables a remote user to log on to this computer and run programs, and supports various TCP/IP Telnet clients.

Uninterruptible Power Supply Service - Manages an uninterruptible power supply (UPS) connected to the computer.

Universal Plug and Play Device Host - Provides support to host Universal Plug and Play devices

Upload Manager - Manages synchronous and asynchronous file transfers between clients and servers on the network.

Volume Shadow Copy Service - Manages and implements Volume Shadow Copies used for backup and other purposes.

Web Client - Enables Windows-based programs to create, access, and modify non-local files across the Internet.

Wireless Zero Configuration - Provides automatic configuration for the 802.11 adapters

WMI Performance Adapter - Provides performance library information from WMI HiPerf providers.

Stopping the Messenger Service

To remove the ability for anyone in the world to pop up messages on your computer,
you can disable the Messenger service.
Click Start->Settings ->Control Panel
Click Performance and Maintenance
Click Administrative Tools
Double click Services
Scroll down and highlight "Messenger"
Right-click the highlighted line and choose Properties
Click the STOP button
Select Disable or Manual in the Startup Type scroll bar Click OK

Everything about Msconfig

Everything about Msconfig

credit to the author hug.gif

Explanation of the System Configuration tabs

This document applies to m*cro$oft Windows 98, Me, and XP.

The m*cro$oft System Configuration (Msconfig) tool is a m*cro$oft software application used to prevent other software applications from opening with Windows. This document explains how to use Msconfig to resolve problems with the computer.

Using Msconfig
Msconfig prevents Windows from using software applications and settings. Use the following steps to prevent all software programs from automatically opening when Windows starts:

CAUTION: The following steps are used to prevent all startup items from opening including antivirus software and other software that may provide important functions. Only use these steps for troubleshooting purposes.

Click Start, and then click Run.

Type the following into the Open field: msconfig

Click OK.

A System Configuration Utility opens.

For Windows 98 and ME, select Selective Startup on the General tab, and remove the checkmark next to Load startup group items.

For Windows 98, remove the checkmarks next to Config.sys and Autoexec.bat.

NOTE: Many software drivers and antivirus software depend on Config.sys and Autoexec.bat in order to work. If you experience problems after completing these steps, perform the steps again replacing the checkmarks next to Config.sys and Autoexec.bat.

For Windows 98 and ME, click the WIN.INI tab, click the plus sign (+) next to the windows folder, and remove the checkmarks next to load= and run=.

For Windows XP, remove the checkmark next to Load Startup Items.

For Windows XP, click the Services tab, select Hide all m*cro$oft services, and remove the checkmarks next to all the items in the list.

When finished, click OK.

Restart the computer for the changes to take effect.

After the computer restarts, a message about using Msconfig should appear.

To continue using Msconfig, click OK and then close the System Configuration window (do not restart the computer). To prevent the pop-up message from appearing again, place a checkmark next to Don't show this message again, and then click OK.

NOTE: Once you have finished troubleshooting an issue, repeat these steps again, replacing the checkmarks, to allow startup programs and service to start with Windows again.

Explanation of the System Configuration tabs
The following list describes the tabs and the items listed inside the tabs in the System Configuration Utility window.

General
Use the General tab to prevent entire types of software applications from opening with Windows. The following selections are on the General tab:

Normal startup. This setting instructs Windows to open all software applications that are normally scheduled to start with Windows

Diagnostic startup. This setting provides a command when Windows opens. Each software application scheduled to start with Windows is displayed, one at a time. Type a Y to open the listed software application or type an N to prevent the listed software application from opening.

Selective startup. Use this setting to prevent software applications of a certain type from starting. Once a specific software application type under Selective startup is selected, then all software applications of that type will open with Windows. For example, select Load startup items to open all
items listed on the Startup tab.

Config.sys (Windows 98 only)
This tab represents items listed inside the system configuration file. The system configuration file is responsible for opening software applications that set up and communicate with hardware components.

Autoexec.bat (Windows 98 only)
This tab represents items listed inside the automatically-executed batch file (autoexec). The autoexec file is responsible for opening DOS software applications before Windows opens. Most of the items inside the autoexec file are thanks to prevent from opening with windows.

System.ini
This tab represents items listed inside the system information file. The system.ini file is responsible for providing Windows with the following information:

Boot - Provides windows with a list of files that opens when Windows opens. Most files are needed for Windows to operate correctly, such as the power driver, Windows sound driver, and Windows mouse driver. Do not remove the check mark next to any item that contains a Windows flag icon next to
the listing.

Description - The names and settings of items, usually hardware, that are used by Windows. These settings should not be changed.

386Enh - Describes the file types that Windows will use for certain functions. Do not remove the check mark next to any item that contains a Windows flag icon next to the listing. Some software applications create a device= listing that causes communication problems with printers, external
storage devices, scanners, and cameras.

Drivers and Drivers32 - Provides Windows the file for audio and video formats. Do not remove the check mark next to any item that contains a Windows flag icon next to the listing.

The other items in this list set up the system environment.

Win.ini
This tab represents items listed inside the Windows information file. The win.ini file is responsible for providing Windows with the following information:

Windows - Software applications listed after load= or run= will automatically open with Windows. Remove the check mark to prevent the listed items from opening.

Desktop - Contains settings for the Windows Desktop. Do not disable Desktop. Instead, set the Windows Desktop theme to None from Display Settings.

Compatibility - Contains settings used by Windows to make certain software applications compatible with Windows. Do not disable.

Other items are settings set up the Windows environment.

Boot.ini (Windows XP)
This tab displays the boot.ini file used to boot Windows. Changes to how
Windows starts can be made here.

Services (Windows XP)
The Services tab lists the programs that start with Windows, or are run periodically by Windows.

Startup
This tab represents software applications that open automatically after Windows opens. Disable individual software applications by removing the
check mark next to the name and path.

For Windows XP, do not disable the following startup items:

Alcxmntr

backupnotify

ccapp

ccregvfy

kbd

LTMSG

NvCpl

ps2

recguard

VTTimer.


For Windows 98 and ME, do not disable the following startup items:

*statemgr (ME only)

hidserv (ME only)

Keyboard manager

Mgarvctlexe

MotiveMonitor

PCHealth

Primax3d Mouse.

ScanRegistry

SystemTray or SysTray

Taskbar Display Controls

USBMMKBD

Vshwin32.exe (98 only)


The following is a list of the types of software applications that open from the Start tab:

Anti-virus software - Disable Anti-virus software only when troubleshooting.

Keyboard managers - Disable to prevent the extended multimedia keys and volume control knob from working.

Systems tray icons - Disable to prevent a software application tray icon from displaying on the systems tray (next to the time).

Environment (Windows Me)

This tab contains the same information in both the Autoexec.bat and Config.sys tabs.

Static VxD

VxD (Virtual Extended Device Driver) files are software applications that load with Windows and are extensions of basic Windows functions. Other software applications and Windows functions may require these files. Disable Static VxD only for troubleshooting.

International
This tab is used to check and change the current language settings. Do not use the International tab. Use International Options from Control Panel instead.

An A-Z Index of the Windows NT/XP command line

An A-Z Index of the Windows NT/XP command line

ADDUSERS
Add or list users to/from a CSV file

ARP
Address Resolution Protocol

ASSOC
Change file extension associations

ASSOCIAT
One step file association

AT
Schedule a command to run at a later time

ATTRIB
Change file attributes

BROWSTAT
Get domain, browser and PDC info

CACLS
Change file permissions

CALL
Call one batch program from another

CD
Change Directory - move to a specific Folder

CHANGE
Change Terminal Server Session properties

CHKDSK
Check Disk - check and repair disk problems

CHKNTFS
Check the NTFS file system

CHOICE
Accept keyboard input to a batch file

CIPHER
Encrypt or Decrypt files/folders

CleanMgr
Automated cleanup of Temp files, recycle bin

CLEARMEM
Clear memory leaks

CLIP
Copy STDIN to the Windows clipboard.

CLS
Clear the screen

CLUSTER
Windows Clustering

CMD
Start a new CMD shell

COLOR
Change colours of the CMD window

COMP
Compare the contents of two files or sets of files

COMPACT
Compress files or folders on an NTFS partition

COMPRESS
Compress individual files on an NTFS partition

CON2PRT
Connect or disconnect a Printer

CONVERT
Convert a FAT drive to NTFS.

COPY
Copy one or more files to another location

CSVDE
Import or Export Active Directory data

DATE
Display or set the date

Dcomcnfg
DCOM Configuration Utility

DEFRAG
Defragment hard drive

DEL
Delete one or more files

DELPROF
Delete NT user profiles

DELTREE
Delete a folder and all subfolders

DevCon
Device Manager Command Line Utility

DIR
Display a list of files and folders

DIRUSE
Display disk usage

DISKCOMP
Compare the contents of two floppy disks

DISKCOPY
Copy the contents of one floppy disk to another

DNSSTAT
DNS Statistics

DOSKEY
Edit command line, recall commands, and create macros

DSADD
Add user (computer, group..) to active directory

DSQUERY
List items in active directory

DSMOD
Modify user (computer, group..) in active directory

ECHO
Display message on screen

ENDLOCAL
End localisation of environment changes in a batch file

ERASE
Delete one or more files

EXIT
Quit the CMD shell

EXPAND
Uncompress files

EXTRACT
Uncompress CAB files

FC
Compare two files

FDISK
Disk Format and partition

FIND Search for a text string in a file

FINDSTR
Search for strings in files

FOR
Conditionally perform a command several times

FORFILES
Batch process multiple files

FORMAT
Format a disk

FREEDISK
Check free disk space (in bytes)

FSUTIL
File and Volume utilities

FTP
File Transfer Protocol

FTYPE
Display or modify file types used in file extension associations

GLOBAL
Display membership of global groups

GOTO
Direct a batch program to jump to a labelled line

HELP
Online Help

HFNETCHK
Network Security Hotfix Checker

IF
Conditionally perform a command

IFMEMBER
Is the current user in an NT Workgroup

INSTSRV
Install an NT Service

IPCONFIG
Configure IP

KILL
Remove a program from memory

LABEL
Edit a disk label

LOCAL
Display membership of local groups

LOGEVENT
Write text to the NT event viewer.

LOGOFF
Log a user off

LOGTIME
Log the date and time in a file

MAPISEND
Send email from the command line

MEM
Display memory usage

MD
Create new folders

MODE
Configure a system device

MORE
Display output, one screen at a time

MOUNTVOL
Manage a volume mount point

MOVE
Move files from one folder to another

MOVEUSER
Move a user from one domain to another

MSG
Send a message

MSIEXEC
m*cro$oft Windows Installer

MSINFO
Windows NT diagnostics

MUNGE
Find and Replace text within file(s)

MV
Copy in-use files

NET
Manage network resources

NETDOM
Domain Manager

NETSH
Configure network protocols

NETSVC
Command-line Service Controller

NBTSTAT
Display networking statistics (NetBIOS over TCP/IP)

NETSTAT
Display networking statistics (TCP/IP)

NOW
Display the current Date and Time

NSLOOKUP
Name server lookup

NTBACKUP
Backup folders to tape

NTRIGHTS
Edit user account rights

PATH
Display or set a search path for executable files

PATHPING
Trace route plus network latency and packet loss

PAUSE
Suspend processing of a batch file and display a message

PERMS
Show permissions for a user

PERFMON
Performance Monitor

PING
Test a network connection

POPD
Restore the previous value of the current directory saved by PUSHD

PORTQRY
Display the status of ports and services

PRINT
Print a text file

PRNCNFG
Display, configure or rename a printer

PRNMNGR Add, delete, list printers set the default printer


PROMPT
Change the command prompt

PUSHD
Save and then change the current directory

QGREP
Search file(s) for lines that match a given pattern.

RASDIAL
Manage RAS connections

ASPHONE
Manage RAS connections

RECOVER
Recover a damaged file from a defective disk.

REG
Read, Set or Delete registry keys and values

REGEDIT
Import or export registry settings

REGSVR32 Register or unregister a DLL

REGINI
Change Registry Permissions

REM
Record comments (remarks) in a batch file

REN
Rename a file or files.

REPLACE
Replace or update one file with another

RD
Delete folder(s)

RDISK
Create a Recovery Disk

RMTSHARE
Share a folder or a printer

ROBOCOPY
Robust File and Folder Copy

ROUTE
Manipulate network routing tables

RUNAS
Execute a program under a different user account

RUNDLL32
Run a DLL command (add/remove print connections)

SC
Service Control

SCHTASKS
Create or Edit Scheduled Tasks

SCLIST
Display NT Services

ScriptIt
Control GUI applications

SET
Display, set, or remove environment variables

SETLOCAL
Begin localisation of environment changes in a batch file

SETX
Set environment variables permanently

SHARE
List or edit a file share or print share

SHIFT
Shift the position of replaceable parameters in a batch file

SHORTCUT
Create a windows shortcut (.LNK file)

SHOWGRPS
List the Workgroups a user is in

SHOWMBRS
List the members of a Workgroup

SHUTDOWN
Shutdown the computer

SLEEP
Wait for x seconds

SOON
Schedule a command to run in the near future

SORT S
ort input

START
Start a separate window to run a specified program or command

SU
Switch User

SUBINACL
Edit file and folder Permissions, Ownership and Domain

SUBST
Associate a path with a drive letter

TASKLIST
List running applications and services

TIME
Display or set the system time

TIMEOUT
Delay processing of a batch file

TITLE
Set the window title for a CMD.EXE session

TOUCH
Change file timestamps

TRACERT
Trace route to a remote host

TREE
Graphical display of folder structure

TYPE
Display the contents of a text file

USRSTAT
List domain usernames and last login

VER
Display version information

VERIFY
Verify that files have been saved

VOL
Display a disk label

WHERE
Locate and display files in a directory tree

WHOAMI
Output the current UserName and domain

WINMSD
Windows system diagnostics

WINMSDP
Windows system diagnostics II

WMIC
WMI Commands

XCACLS
Change file permissions

XCOPY
Copy files and folders

CD protections explained

Table of Contents

1. How to Detect CD/DVD Protection

2. Starforce

3. SafeDisc

4. SecuRom


Topic

Ok this is going to be a long essay. It will describe protections, of StarForce, SecuROM, and SafeDisc. It will say what each one does and how can you by-pass it.

I've done a lot of research to help and explain this, so bear with me.

1. How to Detect CD/DVD Protection

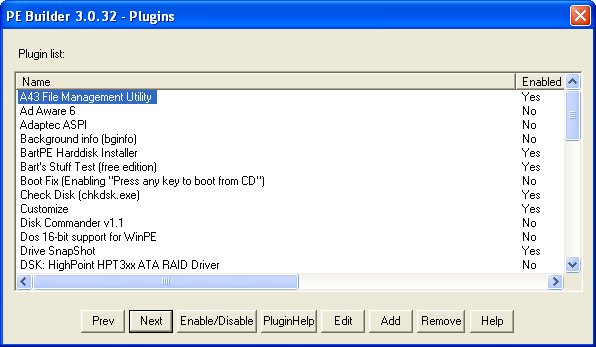
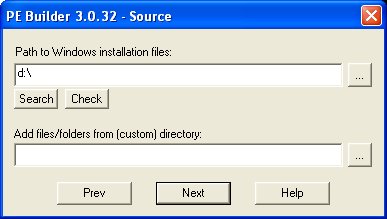
Ok, the title should explain everything. But, if by some unknown force in the cosmos, you don't understand, I will explain. Firstly, to get a program, ideally this one -- A-Ray Scanner (Update: Fixed Link) -- ok, once you get that just follow the instructions and it should/will work.

2. StarForce

Ok, so this is our most dreaded thought. Starforce, one of the leading anti-piracy companies that stop you from creating copies or playing the game cracked or without a CD or DVD.

Definition: StarForce is a software copy prevention brand by the Russian developer Protection Technology. Its compatible with M*cro$oft Windows operating systems, and has received criticism for installing its own unstable device driver onto the computer. Games protected with StarForce are often non-playable even with an original CD-ROM.

Ok still with me? I hope.

Most people find that by using Starforce Nightmare, or unplugging their IDE cables from within' the computer itself will help, and from my experience of doing so, it does.

First, mount the image using Daemon Tools V.4 or Alcohol 120%. Secondly, I'll explain how to use Starforce Nightmare. To use it, you must start the program then disable your Primary Master; what this does is it disable the IDE Cable from your main CD/DVD drive from working, so it's almost like unplugging it. Now, disable your Primary Slave; is your secondary drive, which will, once again disable the CD/DVD from working. Also depending on your computer you may need to disable your secondary master and/or slave drives as well. Therefore, StarForce will be unable to say "Please insert original CD/DVD". Now disable your node, what this does is disable the viewing of your Virtual Drive (i.e. Daemon Tools V.4 or Alcohol 120%).Now if it still doesnt work, then try disabling CD in the menu.

Secondly; now you must get sfcure, once again Illegal to tell you link. Once you get that, extract all the files, then double-click the registry file, click ok, then double-click on setup!.bat, done that good. Now go, restart your computer, and double-click Start!.bat, to start it and Stop!.bat to stop after your done. *Note* You don't need it if you have Daemon Tools V.4

Or you could equally, open your computer and disable the one or two IDE-Cable(s). And it will work, I've also done and tryed this on both computers.

Or if you want, you could also try the USB-Drive solution. Where you have a USB connected CD Drive or DVD Drive and it is known that you can still do it with the latest StarForce version. Some say that it won't last in the upcoming versions of StarForce, we shall see.

Now that you've done these steps, it will and should work, I've done this and working on both computers in my household.

3. SafeDisc

Ok, now on to a more simpler program yet, lately has been a bit though to work with.

Definition: SafeDisc is a CD/DVD copy protection solution by Macrovision Corporation. It is currently marketed as SafeDisc Advanced. SafeDisc aims to resist home media duplication devices, professional duplicators, and reverse engineering attempts.

As the definition says it is there to do what it says. One simple way and most effective way is to mount the image of the game in Daemon Tools V.4 or Alcohol 120% then get sd4hide (You could use Anti-Blaxx) Just do what it says on the application. And, launch the game and play, 100% working, tested on both computers, in household.

If you've done what is listed it will work. Mind you, both computers are completely different manufacturers in my household.

--Note-- You could also use Anti-Blaxx, but I found it a bit harder to do all the steps. I wouldn't recommend Anti-blaxx, it might mess up your computer. Also if you disable your drives for SafeDisc, like for SecuRom, you don't need any Safedisk Hider-Programms. One Programm less to activate.

4. SecuROM

Finally, the last part, yay! SecuROM another protection used to do what SafeDisc is trying to do, stop copying of CD/DVD's and to stop piracy.

Definition: SecuROM is a CD/DVD copy protection solution, most often used for Computer games, by Sony DADC.SecuROM aims to resist home media duplication devices, professional duplicators and reverse engineering attempts. The newest versions prevent 1:1 CD-R copies from being made, and only making ISOs with programs like Alcohol 120%, CloneCD, Daemon Tools can defeat its protection.

Now then, to simply disable this you could use Anti-Blaxx or SR7.STOP. Once again link not posted, it is illegal and do not ask for it here. Now mount your image with Daemon Tools V.4 or Alcohol 120%. Start Anti-Blaxx or SR7.STOP. For my test I used SR7.STOP, works like a charm. Once again tested on both computers and worked.

It's a sad day today. SecuRom has introduced Starforce-like technology
and new blacklstings against Daemon Tools 4, Alcohol 120%, Starforce Nightmare, SR.Stop,
Anti-Blaxx, and so on.

To get a release with the new protection (i.e. Stubbs the Zombie), you will need to do the following:

Method 1

0) Install the game.
1) Mount image in DTool4.
2) Make sure you only have 1 Virtual CD device. If you have an Alcohol virtual
device, e.g., disable it. If you have 2 Daemon Tool drives. Set it only to 1.
3) Use Star++++er (it's a german version -- I might be able to put a link up soon) and click on either primary or secondary all_cd_agressive, once you extract all the files. A message will pop up
"nur dann ok anclicken, wenn zu ende gespielt!" That translates to,
click 'ok' when u have finished playing. So, Don't click OK if you want to play.
4) Some of you will need to unplug your IDE drives.
5) Click on desktop icon and play.

By the way, if u get a message saying "required security module can not be activated"
you might need to reboot.

Method 2

You can also convert the .mds file to a .bwa file, create a Blindwrite
image, and burn it. You will need to unplug your IDE drives and use an
USB drive. We've tested this and it works.

----------------------------------------------

Ok, this is something I've found out recently and fixed. To start games like Matrix Path of Neo(with latest patch), based on SecuROM's latest version.

Running program

1. Get official patch, and install it.
2. Get #2 or #3, mini image. (I used #2, for my test) (Got my mini-image from gamecopyworld)
3. Mount image using Daemon tools 4.0 or Alcohol 120%. (I used Daemon tools for my test)
4. Next, go to control panel>(performance and maintenace - XP)system>click hardware tab>device manager>DVD/CD-ROM drives, then right-click and click disable. Do not disable, SCSI Cd Rom Device(s), if you have more than one. Only your company manufactured one's, (i.e. ASUS). I disabled only my DVD Drive, because I have the DVD version of the game, for my test.
5. Finally, your done, now go play and enjoy.

It worked on both computers in my household, it should on yours. Or could also try something like Virtual CD Hide. To hide all virtual drives.

How to set up a Fedora Core 4 on a USB disk drive

Before you start, make sure your pc will boot off the USB drive - this is a bios setting, turn on the PC with the drive already attached and see if the bios gives the option to boot from it. If all is working, proceed as follows:

Install FC4 using the 'linux expert' command line boot option, the USB drive appears as /dev/sda, so partition and install to that drive. When asked, make sure that grub is installed to the boot sector of the USB drive. This is very important.

Once the system is in, boot up off the rescue CD, dont bother getting it to try and find your linux system, skip that stage and go to the command line. Now mount the / partition on /mnt/system (or whatever mount point it gives you) and the /boot partition on /mnt/system/boot.

Use chroot to change the root to /mnt/system (or wherever you mounted your drives to) and cd to /boot.

now issue the following command:

mkinitrd --preload=ehci-hcd --preload=usb-storage --preload=scsi_mod --preload=sd_mod /boot/[initrdname]-usb.img [kernel-no., as per the kernel you're loading, e.g. 2.6.12-...FC4]

the initrdname should be the same as the kernel, so you can identify it if you upgrade the kernel later - take a look at the existing .img file so you get a good idea what to call it. The kernel number is the same as the kernel you're loading, for instance my kernel filename might be 'vmlinuz-2.6.11-1.1369_FC4', so i'd put '2.6.11-1.1369_FC4' in this field.

Edit /boot/grub/grub.conf and make sure the entry for the kernel you're going to be booting uses the new ...-usb.img file not the original img file.

reboot the computer off the USB drive and check that everything works.

You'll need to repeat this each time you upgrade the kernel, but you dont need to use the rescue disk every time. After your yum or apt update, just cd back to the /boot directory and start from the mkinitrd command with the new kernel info, update grub and reboot.

And there you have it, a fully working USB boot! I keep a brief reminder of these instructions in a text file in my /boot partition, just so I dont forget how to do it on the infrequent occasions that the kernel is updated.

Windows XP Tips

These are some tips for windows xp....

[b]Make your Folders Private


•Open My Computer
•Double-click the drive where Windows is installed (usually drive (C, unless you have more than one drive on your computer).
•If the contents of the drive are hidden, under System Tasks, click Show the contents of this drive.
•Double-click the Documents and Settings folder.
•Double-click your user folder.
•Right-click any folder in your user profile, and then click Properties.
•On the Sharing tab, select the Make this folder private so that only I have access to it check box.


Note
•To open My Computer, click Start, and then click My Computer.
•This option is only available for folders included in your user profile. Folders in your user profile include My Documents and its subfolders, Desktop, Start Menu, Cookies, and Favorites. If you do not make these folders private, they are available to everyone who uses your computer.
•When you make a folder private, all of its subfolders are private as well. For example, when you make My Documents private, you also make My Music and My Pictures private. When you share a folder, you also share all of its subfolders unless you make them private.
•You cannot make your folders private if your drive is not formatted as NTFS For information about converting your drive to NTFS.


[b]How to Convert FAT to NTFS file system

To convert a FAT partition to NTFS, perform the following steps.
Click Start, click Programs, and then click Command Prompt.
In Windows XP, click Start, click Run, type cmd and then click OK.
At the command prompt, type CONVERT [driveletter]: /FS:NTFS.
Convert.exe will attempt to convert the partition to NTFS.
NOTE: Although the chance of corruption or data loss during the conversion from FAT to NTFS is minimal, it is best to perform a full backup of the data on the drive that it is to be converted prior to executing the convert command. It is also recommended to verify the integrity of the backup before proceeding, as well as to run RDISK and update the emergency repair disk (ERD).


[b]For a Safer, faster XP Close Unwanted Services

To disable unneeded startup services for a safer, faster XP, use the "Services" Admin Tool (Control Panel > Administrative Tools > Services) or type 'services.msc' without quotes at Start-Run. If you are a single user of a non-networked machine, you can disable the following items, with no ill effect.

Alerter
Clipbook
Computer Browser
Fast User Switching
Human Interface Access Devices
Indexing Service (Slows the hard drive down)
Messenger
Net Logon (unnecessary unless networked on a Domain)
Netmeeting Remote Desktop Sharing (disabled for extra security)
Remote Desktop Help Session Manager (disabled for extra security)
Remote Procedure Call Locator
Remote Registry (disabled for extra security)
Routing & Remote Access (disabled for extra security)
Server
SSDP Discovery Service (this is for the utterly pointless "Universal P'n'P", & leaves TCP Port 5000 wide open)
TCP/IP NetBIOS Helper
Telnet (disabled for extra security)
Universal Plug and Play Device Host
Upload Manager
Windows Time
Wireless Zero Configuration (for wireless networks)
Workstation


[b]Getting an Older Program to Run on Windows XP

1.Right–click the executable or the program shortcut to the executable, and then click Properties.

2.Select the Run this program in compatibility mode check box.

3.From the list, select an operating system that the program runs in comfortably.

If necessary, also change the display settings and/or resolution, or disable the Windows XP visual themes.
Run the program again when you’re finished changing the settings. Adjust the compatibility settings again if the program is still not running smoothly: a program that’s unhappy on Windows 2000 may flourish on Windows 98.


[b]Rename a Series of Files

When you download photos from your digital camera, they often have unrecognizable names. You can rename several similar files at once with the following procedure. This also works for renaming other types of files.

1.Open the My Pictures folder. (Click Start, and then click My Pictures.) Or open another folder containing files that you want to rename.
2.Select the files you want to rename. If the files you want are not adjacent in the file list, press and hold CTRL, and then click each item to select it.
3.On the File menu, click Rename.
4.Type the new name, and then press ENTER.


All of the files in the series will be named in sequence using the new name you type. For example, if you type image, the first will be named image and subsequent files in the series will be named image (1), image (2), and so on. To specify the starting number for the series, type the starting number in parentheses after the new file name. The files in the series will be numbered in sequence starting with the number you type. For example, if you type image (10), the other files will be named image (11), image (12), and so on.


[b]Never Re-Activate After Installation

If you have to reinstall Windows XP you normally will have to reactivate too. Well not anymore. Just copy wpa.dbl after you activated the first time. It is located in the WINDOWSsystem32 folder. Now if you reinstall Windows XP just copy the file back and you're up and running again.


[b]XP Animations

You can turn off window animation ("exploding" windows), displayed when you play around with minimizing/maximizing open windows. This makes navigating Windows 95/98/ME/NT4/2000/XP a lot quicker, especially if you don't have a fast video controller, or if you got tired of seeing it all the time (like I did).
To do this, run Regedit (or Regedt32) and go to:
HKEY_CURRENT_USER | Control Panel | Desktop | WindowMetrics
or if you are the only user of your Windows computer go to:

HKEY_USERS | .Default | Control Panel | Desktop | WindowMetrics

Right-click on an empty spot in the right hand pane. Select New -> String [REG_SZ] Value. Name it MinAnimate. Click OK. Double-click on "MinAnimate" and type 0 to turn OFF window animation or 1 to turn it ON. Click OK. Close the Registry Editor and restart Windows. Done.


[b]Don't Ignore the Windows Logo Key

The Windows logo key, located in the bottom row of most computer keyboards is a little-used treasure. Don't ignore it.
It is the shortcut anchor for the following commands:
CODE


Windows: Display the Start menu

Windows + D: Minimize or restore all windows

Windows + E: Display Windows Explorer

Windows + F: Display Search for files

Windows + Ctrl + F: Display Search for computer

Windows + F1: Display Help and Support Center

Windows + R: Display Run dialog box

Windows + break: Display System Properties dialog box

Windows + shift + M: Undo minimize all windows

Windows + L: Lock the workstation

Windows + U: Open Utility Manager

Linux User Commands

../ --> represents one directory higher

cat filename --> display file contents

cat stuff1 stuff2 > allStuff --> combine files

cat someStuff >> allStuff --> append to a file

cd dirName --> go into the directory dirName

chmod [permission mode] file --> change the permission of a file
(4=read, 2=write, 1=execute for user/group/all)

chown user file --> change the owner of a file

clear --> clear the terminal

cp file1 file2 --> copy file1 to file2

date --> print current date and time

find someStuff --> locate a file or directory

finger user --> get some info about a user

free --> display some stats about memory usage

ftp hostname --> connect to an ftp server

gunzip file.gz --> extract contents of gzipped compressed files

hostname --> display the hostname of the computer

kill [ID] --> terminate a process

less --> file view file in terminal with ability to scroll up and down

ln sourceName destDirectory --> create symbolic link to a file

locate file --> locate a file from a database maintained by the computer

login --> login to the computer

lpr file --> sends a file to the print spooler

ls --> list the contents of the current directory

ls directory --> list the contents of a given directory

man program --> display manual pages for a program

mkdir directory --> create a directory

more file --> view file in terminal with ability to scroll down

mv source target --> move a file

passwd --> user change a user's password

pico file --> open a file in the pico text editor

pwd --> print the full pathname of the current directory

quota user --> display the disk quota allocated to a user

rm file --> delete a file

rmdir directory --> delete a directory

rm -rf --> anything forcefully delete something (like a directory,
recursively)

sh --> the standard Unix shell, bash

ssh hostname --> open an ssh session

su --> switch to the superuser's (root's) identity

su user --> switch to another user's identity

tail file --> print the last 10 lines of a file

telnet hostname --> open a telnet session

touch file --> update the access time and last modified time for a file to the current time and date

uname -a --> print system information

vi file --> open a file in the vi or vim text editor

who am i --> gives info about the current user

who -uH --> gives info and idle times for all users

Linux Sys Admin Commands

halt --> shuts down the machine

mount /mnt/floppy --> mounts the floppy fs

mount /mnt/cdrom --> mounts the cd-rom fs

shutdown -r "now" --> restarts the machine

umount mountedLocation --> unmounts a filesystem

update db --> update file database used by locate command

Yahoo Chat Commands

/help - calls up the help file


/cls - clears the screen


/save - saves the current chat session transcript


/leave - exits current room


/join roomname - joins roomname


/goto username - joins the chat room that username is currently in


/follow username - user will follows username whenever the user changes rooms


/think - text posts text in this format "oO(text)"


/tell username text - -- allows you to send a text to username with opening a window


/invite username - invites username to the current room


/webcam - starts your webcam


/version - displays the program version


/version username - sends the program version to username


/time - shows the time


/roll number - rolls the number of dice


/logoff - closes the client


/ignore add username - will add username to your ignore list


/ignore remove username - will remove username from your ignore list


:Text - formats the text as an emotion

All Excel Short Cuts

CTRL+arrow: key Move to the edge of the current data region

HOME: Move to the beginning of the row

CTRL+HOME: Move to the beginning of the worksheet

CTRL+END: Move to the last cell on the worksheet, which is the cell at the intersection of the rightmost used column and the bottom-most used row (in the lower-right corner), or the cell opposite the home cell, which is typically A1
PAGE DOWN: Move down one screen

PAGE UP: Move up one screen

ALT+PAGE DOWN: Move one screen to the right

ALT+PAGE UP: Move one screen to the left

CTRL+PAGE DOWN: Move to the next sheet in the workbook

CTRL+PAGE UP: Move to the previous sheet in the workbook

CTRL+F6 or CTRL+TAB: Move to the next workbook or window

CTRL+SHIFT+F6 or CTRL+SHIFT+TAB: Move to the previous workbook or window

F6: Move to the next pane in a workbook that has been split

SHIFT+F6: Move to the previous pane in a workbook that has been split

CTRL+BACKSPACE: Scroll to display the active cell

F5: Display the Go To dialog box

SHIFT+F5: Display the Find dialog box

SHIFT+F4: Repeat the last Find action (same as Find Next)

TAB: Move between unlocked cells on a protected worksheet

Keys for moving in a worksheet with End mode on

END: Turn End mode on or off

END, arrow key: Move by one block of data within a row or column

END, HOME: Move to the last cell on the worksheet, which is the cell at the intersection of the rightmost used column and the bottom-most used row (in the lower-right corner), or the cell opposite the home cell, which is typically A1

END, ENTER: Move to the last cell to the right in the current row that is not blank; unavailable if you have selected the Transition navigation keys check box on the Transition tab (Tools menu, Options command)

Keys for moving in a worksheet with SCROLL LOCK on

SCROLL LOCK: Turn SCROLL LOCK on or off

HOME: Move to the cell in the upper-left corner of the window

END: Move to the cell in the lower-right corner of the window

UP ARROW or DOWN ARROW: Scroll one row up or down

LEFT ARROW or RIGHT ARROW: Scroll one column left or right

Tip When you use scrolling keys (such as PAGE UP and PAGE DOWN) with SCROLL LOCK turned off, your selection moves the distance you scroll. If you want to preserve your selection while you scroll through the worksheet, turn on SCROLL LOCK first.

Keys for previewing and printing a document

CTRL+P or CTRL+SHIFT+F12: Display the Print dialog box

Work in print preview

Arrow keys: Move around the page when zoomed in

PAGE UP or PAGE DOWN: Move by one page when zoomed out

CTRL+UP ARROW or CTRL+LEFT ARROW: Move to the first page when zoomed out

CTRL+DOWN ARROW or CTRL+RIGHT ARROW: Move to the last page when zoomed out

Keys for working with worksheets, charts, and macros

SHIFT+F11 or ALT+SHIFT+F1: Insert a new worksheet

F11 or ALT+F1: Create a chart that uses the current range

ALT+F8: Display the Macro dialog box

ALT+F11: Display the Visual Basic Editor

CTRL+F11: Insert a M*cro$oft Excel 4.0 macro sheet

CTRL+PAGE DOWN: Move to the next sheet in the workbook

CTRL+PAGE UP: Move to the previous sheet in the workbook

SHIFT+CTRL+PAGE DOWN: Select the current and next sheet in the workbook

SHIFT+CTRL+PAGE UP: Select the current and previous sheet in the workbook

Keys for entering data on a worksheet

ENTER: Complete a cell entry and move down in the selection

ALT+ENTER: Start a new line in the same cell

CTRL+ENTER: Fill the selected cell range with the current entry

SHIFT+ENTER: Complete a cell entry and move up in the selection

TAB: Complete a cell entry and move to the right in the selection

SHIFT+TAB: Complete a cell entry and move to the left in the selection

ESC: Cancel a cell entry

BACKSPACE: Delete the character to the left of the insertion point, or delete the selection

DELETE: Delete the character to the right of the insertion point, or delete the selection

CTRL+DELETE: Delete text to the end of the line

Arrow keys: Move one character up, down, left, or right

HOME: Move to the beginning of the line

F4 or CTRL+Y: Repeat the last action

SHIFT+F2: Edit a cell comment

CTRL+SHIFT+F3: Create names from row and column labels

CTRL+D: Fill down

CTRL+R: Fill to the right

CTRL+F3: Define a name

Keys for working in cells or the formula bar

BACKSPACE: Edit the active cell and then clear it, or delete the preceding character in the active cell as you edit cell contents

ENTER: Complete a cell entry

CTRL+SHIFT+ENTER: Enter a formula as an array formula

ESC: Cancel an entry in the cell or formula bar

CTRL+A: Display the Formula Palette after you type a function name in a formula

CTRL+SHIFT+A: Insert the argument names and parentheses for a function after you type a function name in a formula

CTRL+K: Insert a hyperlink

ENTER (in a cell with a hyperlink): Activate a hyperlink

F2: Edit the active cell and position the insertion point at the end of the line

F3: Paste a defined name into a formula

SHIFT+F3: Paste a function into a formula

F9: Calculate all sheets in all open workbooks

CTRL+ALT+F9: Calculate all sheets in the active workbook

SHIFT+F9: Calculate the active worksheet

= (equal sign): Start a formula

ALT+= (equal sign): Insert the AutoSum formula

CTRL+; (semicolon): Enter the date

CTRL+SHIFT+: (colon): Enter the time

CTRL+SHIFT+" (quotation mark): Copy the value from the cell above the active cell into the cell or the formula bar

CTRL+` (single left quotation mark): Alternate between displaying cell values and displaying cell formulas

CTRL+' (apostrophe): Copy a formula from the cell above the active cell into the cell or the formula bar

ALT+DOWN ARROW: Display the AutoComplete list


Keys for formatting data

ALT+' (apostrophe): Display the Style dialog box

CTRL+1: Display the Format Cells dialog box

CTRL+SHIFT+~: Apply the General number format

CTRL+SHIFT+$: Apply the Currency format with two decimal places (negative numbers appear in parentheses)

CTRL+SHIFT+%: Apply the Percentage format with no decimal places

CTRL+SHIFT+^: Apply the Exponential number format with two decimal places

CTRL+SHIFT+#: Apply the Date format with the day, month, and year

CTRL+SHIFT+@: Apply the Time format with the hour and minute, and indicate A.M. or P.M.

CTRL+SHIFT+!: Apply the Number format with two decimal places, thousands separator, and minus sign (–) for negative values

CTRL+SHIFT+&: Apply the outline border

CTRL+SHIFT+_: Remove outline borders

CTRL+B: Apply or remove bold formatting

CTRL+I: Apply or remove italic formatting

CTRL+U: Apply or remove an underline

CTRL+5: Apply or remove strikethrough formatting

CTRL+9: Hide rows

CTRL+SHIFT+( (opening parenthesis): Unhide rows

CTRL+0 (zero): Hide columns

CTRL+SHIFT+) (closing parenthesis): Unhide columns

Keys for editing data

F2: Edit the active cell and put the insertion point at the end of the line

ESC: Cancel an entry in the cell or formula bar

BACKSPACE: Edit the active cell and then clear it, or delete the preceding character in the active cell as you edit the cell contents

F3: Paste a defined name into a formula

ENTER: Complete a cell entry

CTRL+SHIFT+ENTER: Enter a formula as an array formula

CTRL+A: Display the Formula Palette after you type a function name in a formula

CTRL+SHIFT+A: Insert the argument names and parentheses for a function, after you type a function name in a formula

F7: Display the Spelling dialog box

Keys for inserting, deleting, and copying a selection

CTRL+C: Copy the selection

CTRL+X: Cut the selection

CTRL+V: Paste the selection

DELETE: Clear the contents of the selection

CTRL+HYPHEN: Delete the selection

CTRL+Z: Undo the last action

CTRL+SHIFT+PLUS SIGN: Insert blank cells

Keys for moving within a selection

ENTER: Move from top to bottom within the selection (down), or move in the direction that is selected on the Edit tab (Tools menu, Options command)

SHIFT+ENTER: Move from bottom to top within the selection (up), or move opposite to the direction that is selected on the Edit tab (Tools menu, Options command)

TAB: Move from left to right within the selection, or move down one cell if only one column is selected

SHIFT+TAB: Move from right to left within the selection, or move up one cell if only one column is selected

CTRL+PERIOD: Move clockwise to the next corner of the selection

CTRL+ALT+RIGHT ARROW: Move to the right between nonadjacent selections

CTRL+ALT+LEFT ARROW: Move to the left between nonadjacent selections

Keys for selecting cells, columns, or rows

CTRL+SHIFT+* (asterisk): Select the current region around the active cell (the current region is a data area enclosed by blank rows and blank columns)

SHIFT+arrow key: Extend the selection by one cell

CTRL+SHIFT+arrow key: Extend the selection to the last nonblank cell in the same column or row as the active cell

SHIFT+HOME: Extend the selection to the beginning of the row

CTRL+SHIFT+HOME: Extend the selection to the beginning of the worksheet

CTRL+SHIFT+END: Extend the selection to the last used cell on the worksheet (lower-right corner)

CTRL+SPACEBAR: Select the entire column

SHIFT+SPACEBAR: Select the entire row

CTRL+A: Select the entire worksheet

SHIFT+BACKSPACE: Select only the active cell when multiple cells are selected

SHIFT+PAGE DOWN: Extend the selection down one screen

SHIFT+PAGE UP: Extend the selection up one screen

CTRL+SHIFT+SPACEBAR: With an object selected, select all objects on a sheet

CTRL+6: Alternate between hiding objects, displaying objects, and displaying placeholders for objects

CTRL+7: Show or hide the Standard toolbar

F8: Turn on extending a selection by using the arrow keys

SHIFT+F8: Add another range of cells to the selection; or use the arrow keys to move to the start of the range you want to add, and then press F8 and the arrow keys to select the next range

SCROLL LOCK, SHIFT+HOME: Extend the selection to the cell in the upper-left corner of the window

SCROLL LOCK, SHIFT+END: Extend the selection to the cell in the lower-right corner of the window

Tip When you use the scrolling keys (such as PAGE UP and PAGE DOWN) with SCROLL LOCK turned off, your selection moves the distance you scroll. If you want to keep the same selection as you scroll, turn on SCROLL LOCK first.

Keys for extending the selection with End mode on

END: Turn End mode on or off

END, SHIFT+arrow key: Extend the selection to the last nonblank cell in the same column or row as the active cell

END, SHIFT+HOME: Extend the selection to the last cell used on the worksheet (lower-right corner)

END, SHIFT+ENTER: Extend the selection to the last cell in the current row. This keystroke is unavailable if you selected the Transition navigation keys check box on the Transition tab (Tools menu, Options command).

Keys for selecting cells that have special characteristics

CTRL+SHIFT+* (asterisk): Select the current region around the active cell (the current region is a data area enclosed by blank rows and blank columns)

CTRL+/: Select the current array, which is the array that the active cell belongs to

CTRL+SHIFT+O (the letter O): Select all cells with comments

CTRL+: Select cells in a row that don't match the value in the active cell in that row. You must select the row starting with the active cell.

CTRL+SHIFT+|: Select cells in a column that don't match the value in the active cell in that column. You must select the column starting with the active cell.

CTRL+[ (opening bracket): Select only cells that are directly referred to by formulas in the selection

CTRL+SHIFT+{ (opening brace): Select all cells that are directly or indirectly referred to by formulas in the selection

CTRL+] (closing bracket): Select only cells with formulas that refer directly to the active cell

CTRL+SHIFT+} (closing brace): Select all cells with formulas that refer directly or indirectly to the active cell

ALT+; (semicolon): Select only visible cells in the current selection

Keys for selecting a chart sheet

CTRL+PAGE DOWN: Select the next sheet in the workbook, until the chart sheet you want is selected

CTRL+PAGE UP: Select the previous sheet in the workbook, until the chart sheet you want is selected

Keys for selecting an embedded chart

Note The Drawing toolbar must already be displayed.

Press F10 to make the menu bar active.

Press CTRL+TAB or CTRL+SHIFT+TAB to select the Drawing toolbar

Press the RIGHT ARROW key to select the Select Objects button on the Drawing toolbar.

Press CTRL+ENTER to select the first object.

Press the TAB key to cycle forward (or SHIFT+TAB to cycle backward) through the objects until sizing handles appear on the embedded chart you want to select.

Press CTRL+ENTER to make the chart active.

Keys for selecting chart items

DOWN ARROW: Select the previous group of items

UP ARROW: Select the next group of items

RIGHT ARROW: Select the next item within the group

LEFT ARROW: Select the previous item within the group

Keys for working with a data form

ALT+key, where key is the underlined letter in the field or command name: Select a field or a command button

DOWN ARROW: Move to the same field in the next record

UP ARROW: Move to the same field in the previous record

TAB: Move to the next field you can edit in the record

SHIFT+TAB: Move to the previous field you can edit in the record

ENTER: Move to the first field in the next record

SHIFT+ENTER: Move to the first field in the previous record

PAGE DOWN: Move to the same field 10 records forward

CTRL+PAGE DOWN: Move to a new record

PAGE UP: Move to the same field 10 records back

CTRL+PAGE UP: Move to the first record

HOME or END: Move to the beginning or end of a field

SHIFT+END: Extend a selection to the end of a field

SHIFT+HOME: Extend a selection to the beginning of a field

LEFT ARROW or RIGHT ARROW: Move one character left or right within a field

SHIFT+LEFT ARROW: Select the character to the left

SHIFT+RIGHT ARROW: Select the character to the right

Keys for using AutoFilter

Arrow keys to select the cell that contains the column label, and then press ALT+DOWN ARROW: Display the AutoFilter list for the current column

DOWN ARROW: Select the next item in the AutoFilter list

UP ARROW: Select the previous item in the AutoFilter list

ALT+UP ARROW: Close the AutoFilter list for the current column

HOME: Select the first item (All) in the AutoFilter list

END: Select the last item in the AutoFilter list

ENTER: Filter the list by using the selected item in the AutoFilter list

Keys for outlining data

ALT+SHIFT+RIGHT ARROW: Group rows or columns

ALT+SHIFT+LEFT ARROW: Ungroup rows or columns

CTRL+8: Display or hide outline symbols

CTRL+9: Hide selected rows

CTRL+SHIFT+( (opening parenthesis): Unhide selected rows

CTRL+0 (zero): Hide selected columns

CTRL+SHIFT+) (closing parenthesis): Unhide selected columns

Keys for the PivotTable and PivotChart Wizard

UP ARROW or DOWN ARROW: Select the previous or next field button in the list

LEFT ARROW or RIGHT ARROW: Select the field button to the left or right in a multicolumn field button list

ALT+C: Move the selected field into the Column area

ALT+D: Move the selected field into the Data area

ALT+L: Display the PivotTable Field dialog box

ALT+P: Move the selected field into the Page area

ALT+R: Move the selected field into the Row area

Keys for page fields in a PivotTable or PivotChart report

CTRL+SHIFT+* (asterisk): Select the entire PivotTable report

Arrow keys to select the cell that contains the field, and then ALT+DOWN ARROW: Display the list for the current field in a PivotTable report

Arrow keys to select the page field in a PivotChart report, and then ALT+DOWN ARROW: Display the list for the current page field in a PivotChart report

UP ARROW: Select the previous item in the list

DOWN ARROW: Select the next item in the list

HOME: Select the first visible item in the list

END: Select the last visible item in the list

ENTER: Display the selected item

SPACEBAR: Select or clear a check box in the list

Keys for laying out a PivotTable or PivotChart report

Press F10 to make the menu bar active.

Press CTRL+TAB or CTRL+SHIFT+TAB to select the PivotTable toolbar.

Press the LEFT ARROW or RIGHT ARROW key to select the menu to the left or right or, when a submenu is visible, to switch between the main menu and submenu.

Press ENTER (on a field button) and the DOWN ARROW and UP ARROW keys to select the area you want to move the selected field to.

Note To scroll to the top or bottom of the field list, press ENTER on the More Fields or button.

Keys for grouping and ungrouping PivotTable items

ALT+SHIFT+RIGHT ARROW: Group selected PivotTable items

ALT+SHIFT+LEFT ARROW: Ungroup selected PivotTable items

Keys to use with the OLAP Cube Wizard

Use these keys to complete Step 2 in the OLAP Cube Wizard.

To move a field from the Source fields list to the Dimensions box

Press the TAB key to select the Source fields list.

Press the UP ARROW or DOWN ARROW key to select the field you want to move. Because you cannot change the order of a field after you move it, select first the field you want to appear at the top of the Dimensions box.

Press the TAB key to select the > button, and then press ENTER.

To move other fields, repeat steps 1 through 3.

To move a field to a lower or higher level in the Dimensions box

Press the TAB key to select the Dimensions box.

Press the UP ARROW or DOWN ARROW key to select the field you want to move.

Press CTRL+X.

Press the UP ARROW or DOWN ARROW key to select where you want to move the field.

Press CTRL+V.

Excel Dashboard Reports & Excel Dashboard Charts

Patch Watch: Critical updates from Adobe, Cisco, Symantec, McAfee

Patch Watch: Critical updates from Adobe, Cisco, Symantec, McAfee

Critical updates from Adobe, Cisco, Symantec, McAfeePatch Tuesday is no longer an exclusive Microsoft event. Slowly but surely, it’s beginning to look like more and more big-name software vendors are piggybacking on Microsoft’s scheduled patch day to roll out critical software fixes.

This week, in addition to Microsoft’s six bulletins, computer users should also pay attention to high-severity updates from Adobe, Cisco, Symantec and McAfee.

Adobe rolled out two updates for gaping holes in Flash Player and PhotoShop CS2 and CS3, warning that attackers can exploit the vulnerabilities remotely to launch harmful code.

The Flash Player patch addresses several issues affecting Flash Player versions 8 through 9.

  • An input validation error has been identified in Flash Player 9.0.45.0 and earlier versions that could lead to the potential execution of arbitrary code. This vulnerability could be accessed through content delivered from a remote location via the user’s web browser, email client, or other applications that include or reference the Flash Player. (CVE-2007-3456)
  • An issue with insufficient validation of the HTTP Referer has been identified in Flash Player 8.0.34.0 and earlier. This issue does not affect Flash Player 9. This issue could potentially aid an attacker in executing a cross-site request forgery attack. (CVE-2007-3457)
  • The Linux and Solaris updates for Flash Player 7 (7.0.70.0) address the issues with Flash Player and the Opera and Konqueror browsers described in Security Advisory APSA07-03. These issues do not impact Flash Player 9 on Linux or Solaris. (CVE-2007-2022)

Adobe’s Photoshop update, also rated “critical,” addresses flaws that could be triggered by opening malicious image files.

Multiple input validation errors have been identified in Photoshop CS2 and Photoshop CS3 which could lead to the potential execution of arbitrary code. These vulnerabilities are not remotely exploitable, but could, for instance, be triggered by opening a malicious BMP, DIB, RLE or PNG file delivered to a user via their e-mail client. Users are recommended to update their installations with the patches provided below, and Adobe encourages all customers to be cautious before opening any unknown file, regardless of which application they may be using. These issues were previously publicly disclosed by a third party (CVE-2007-2244 and CVE-2007-2365).

Joining Adobe in the patching line with two bulletins is Cisco Systems. The switching and routing giant shipped two bulletins to correct critical bugs in the Cisco Unified Communications Manager (formerly CallManager).

Cisco Systems, Inc.The first Cisco bulletin warns to two overflow vulnerabilities that could allow a remote, unauthenticated user to cause a denial of service (DoS) condition or execute arbitrary code.

The second update contains this warning from Cisco:

Cisco Unified Communications Manager (CUCM), formerly CallManager, and Cisco Unified Presence Server (CUPS) contain two vulnerabilities that could allow an unauthorized administrator to activate and terminate CUCM / CUPS system services and access SNMP configuration information. This may respectively result in a denial of service (DoS) condition affecting CUCM/CUPS cluster systems and the disclosure of sensitive SNMP details, including community strings.

http://www.symantec.com/img/util/logo_nav.jpgSeparately, Symantec plugged a heap buffer overflow vulnerability that affects the Symantec Backup Exec for Windows Servers software. CERT/CC warns that a remote unauthenticated attacker may be able to cause the affected service to crash, resulting in a denial of service. Symantec also reports that the attacker may also potentially be able to execute arbitrary code on the affected system.

McAfee®, Inc.Rival McAfee also joined the patching party, fixing four different memory corruption vulnerabilities in the e-Policy Orchestrator Agent.

Create a Windows Boot CD / Rescue CD

This is one of the handiest tools I've seen in a long time. BartPE helps you to create a Windows XP boot CD that looks and feels just like Windows. Forget your old DOS boot disks and other rescue CDs -- this is the best rescue tool I've used for getting rid of viruses and ad-ware. This tutorial will show you how to create your own Windows Boot CD with BartPE -- and all you need is your Windows XP CD, and a CD-R drive.

The first step is to download the program. You should check this site for the latest version, or you can download version 3.0.32 directly from here. We recommend checking for a new version however.

Once you've downloaded and unzipped the file, run pebuilder.exe. You should see the intro screen. Just hit the Next button to get started.

Now you should see a screen asking you for the path to your Windows installation files. Pop in your Windows XP CD, then type in the drive letter of your CD-ROM drive (i.e. D:). When you hit the check button, you should see a message telling you that the source is valid. If it doesn't recognize the CD for some reason (or one didn't come with your PC), try using your C: drive as the source, as many manufacturers will place the Windows XP CD contents directly on your C: drive.

Once the check is successful, hit next to proceed.

Now you will be confronted with a vast array of plug-ins that you can add to your boot CD. The plug-ins allow you to add functionality to your boot CD, such as virus-checking, or spyware checking, or even a web browser. Look through the list and see if there's anything that you would like to add. You can click on a plug-in in this windows and choose the PluginHelp button to get more information on the plug-in and how to enable it.

In this case, we're going to add McAfee's STINGER virus-removal tool to our CD. With the Sasser virus being the virus-du-jour, a Windows boot CD can really help you clean up your friends' and family's PCs. Scroll down in the list and find McAfee Stinger. Click the PluginHelp button to receive the latest instructions on how to enable it. With version 3.0.32, here's what we did:
- We downloaded the latest Stinger tool from
McAfee's site - We moved the stinger.exe into the plugins/stinger directory of the BartPE tool. (This is where you unzipped the file you downloaded at the beginning of the tutorial) - We went back to the PEBuilder application, highlighted the McAfee Stinger option, and clicked the Enable/Disable button. The "No" next to the option should change into a "Yes".

There are dozens of plug-ins available -- check here for a list. Click the Next button when you are done selecting and installing your plug-ins. You will now see a screen where you can choose where your files will be saved. The first directory is a working directory on your hard drive where temporary files will be saved. Make sure you have several hundred megabytes of free disk space on the drive where you choose to store these temporary files.

The second directory is where you will be storing the ISO image. An ISO image is a single file that contains an entire CD's worth of information. By using this ISO file with your CD creation program, you will be able to create your CD.

Hit Next to continue. BartPE will now go through and create the ISO image for your Windows Boot CD! When it's done, click Next to continue. Then click Exit to exit the program.

Now you can use your favorite CD recording program to burn the ISO image you created onto a CD. Every CD recording program is different, but most, if not all, support ISO images. Just find the option where you can "burn image from disk", choose the ISO file, and hit Start!

Once your CD has been created, you can put it into any recent PC, reboot the PC, and the Windows XP BootCD will load!

PC Pitstop Full Tests

Just park your PC in one of their bays and grab a cup of coffee. Their automated mechanics will put your PC safely through a battery of tests to check its health, configuration and performance.

The diagnostics take between one and five minutes depending upon your system and modem speed. You'll be informed along the way on the status of our testing, and at the end you'll get a 'clickable' report on your PC's health and performance.


Free Performance Scan

PC Performance Scan
Find out if your PC is running at maximum performance with our free scan.

Disk Health

Disk Health
Get your disk spinning at peak performance with the most thorough disk analyzer in the biz.

Free Spyware Scan

Spyware Scan
Spyware installs without your knowledge, and reduces system performance and reliability.

Personal Data Profiler

Personal Data Profiler
Our profiler helps you learn a lot about the user of a PC. Or learn what others may discover about you!

Driver Scan

Driver Scan
Drivers are constantly being updated to improve the functionality and stability of your PC.

Full Test

Full Tests
Put your PC through our free full tests for the most thorough analysis of your PC's performance, reliability and security.