Reorganize Your Taskbar Buttons and Tray Icons in XP/Vista

Whether you are taking screenshots of a portion of your desktop or just prefer to have two apps you are using sitting next to each other on the taskbar, it can be really frustrating that you can't move the taskbar buttons around. There's a small utility called Taskbar Shuffle that gives us this power and more.

Once installed, you can simply drag and drop to reorganize the taskbar buttons.

image

You can also hold down the Ctrl key and reorganize the tray icons… notice that the Outlook icon is in the middle here…

image

And after moving it now it's over on the right.

image

The settings dialog gives a really interesting option, the ability to group tasks but not collapse them into a button… so instead of this:

image

You get this… you'll notice the three Windows Live Writer buttons are grouped, but not consolidated into a button.

image

To set this option, open up the Settings dialog and choose the option for "group tasks but never collapse into one button".

image

You'll also note that you can close windows with a middle click, which makes the taskbar work like Firefox's tab bar.

Very useful utility, and you don't necessarily have to keep it running all the time. Just start it up when you want to move the buttons around, and then close it.

Download Taskbar Shuffle from freewebs.com

Assign Keyboard Media Keys to Work in Winamp

Have you ever wondered how to make the media keys on your keyboard actually work for Winamp? Reader Shawn was asking me this question a while back, but then he figured it out on his own and sent me the instructions.

Turns out it's incredibly simple, and on most installations will be already set by default, but might not be enabled. If yours are not working, then you need to follow these instructions.

Open up the Winamp Preferences and the browse down to General Preferences \ Global Hotkeys.

image

The first thing you should check is whether the "Enabled" hotkey is checked. If it's not, then select that and most likely that will fix your issue.

If you need to manually change the settings instead, select the Action in the list, and then click inside the Hotkey textbox. Press the media key on your keyboard representing the function you are trying to do. For instance, I selected the Playback: Play/pause action in the list, so I pressed the Play button on my keyboard, which shows up as Play/Pause in the hotkey box.

Make sure you click the Set button when you make the change.

Make Your XP Computer Look Like OS X

For whatever reason, many Windows XP users are obsessed with making their desktop look like a Mac. It's not a new phenomenon, but the enterprising people over at FlyakiteOSX created a really easy way to transform your desktop into an OS X look & feel without a lot of trouble.

Note: This installation will change a lot of files and install a whole bunch of utilities, so proceed with caution if you aren't prepared to deal with any problems that might happen.

When you launch the setup you'll eventually get to this screen, where you should check the box for "Create System Restore Point", along with whichever options you want.

image

After installation and rebooting your computer, you'll be presented with a desktop that looks very much like OS X.

image

It even updates your shutdown screen…

image

And the login screen…

image

There's an included "System Preferences" application that looks just like the one in OS X, but works differently… when you click on the icons it will launch the relevant Windows settings panel.

image

If you have problems trying to remove this, remember that you setup a Restore point during setup. You can always return everything back to normal by using System Restore if you need to.

Update

You can download an updated version from here:

You can visit the author's site for a list of mirrors, or Download FlyaKiteOSX 3.5 from osx-e.com.

Firefox & IE Prompt You To Remember Passwords - Do You Say Yes ?

When you type a password into any web form, both Internet Explorer and Firefox prompt whether you would like them to remember your password.

If that's a personal computer, chances are high that you will click Yes and the password is then saved in the web browser.

remember my password firefox remember password

This "Remember Me" option in web browsers is useful but it actually puts your login credentials at serious risk especially in Firefox.

View stored passwords in Internet Explorer:

Though IE stores your passwords in encrypted form in the Windows Registry database, anyone can easily view your passwords using a free 35kb tool called IE PassView.

The tool automatically displays a list all auto-complete entries saved inside IE. See screenshot.

internet explorer passwords

View stored passwords in Firefox:

With Firefox, it gets much simpler and anyone who knows how to use a mouse can see all your passwords stored inside Firefox.

The route is Tools -> Options -> Security -> Show Passwords. And there you have all the passwords that you ever asked Firefox to remember for you.

firefox passwords

Even that short visit to a nearby coffee vending machine could leak your identity as all it takes is few seconds for anyone to view your secret passwords.

To keep yourself safe, uncheck "Prompt me to save passwords" in Internet Explorer and "Set Master Password" in Firefox.


Two Users Can Work On The Same Computer At The Same Time

Two Users on One Computer Do you have a spare computer monitor lying unused in some corner of the house? You can easily convert that monitor into a proper PC by just attaching it to one of your existing computers - no additional hardware required.

And do not confuse this setup with Microsoft Multipoint or dual-screens

here two monitors are connected to the same CPU but they are two separate computers. Two users can simultaneously perform different tasks on each of the monitor using their own keyboard and mouse.

This is possible through a free software called Userful which is essentially a Linux Live CD. You connect the two monitors to one computer, pop the CD inside and boot.

Now two users can surf different websites, access their personal emails, write documents and more at the same time on their personal screens. They'll also have access to common devices like the printer and scanner attached to the main computer.

This solution may appeal when you have basic computing requirements or have no budget for an extra computer.

Userful Desktop Multiplier | Download Live CD


How to reinstall System Restore in Windows XP?

System Restore is one of the most useful tools available in Windows XP, which can help you restore the computer to an earlier state, when a problem occurs in your computer. There are situations where you are required to reinstall System Restore in order to restore its functionality. This article explains how to reinstall System Restore using the INF file.

The following procedure will remove all the existing System Restore points, and resets the System Restore drive monitoring options to defaults (monitors all drives by default.)

Reinstalling System Restore

1. Click Start, Run and type %Windir%\INF

2. Locate the SR.INF file. If you have configured Windows Explorer to hide known file extensions, the file may show up as SR. To see the file extensions for all file types, then try this:

* On the Tools menu in My Computer, click Folder Options.
* Click the View tab.
* Clear the Hide extensions for known file types check box.

3. Right-click the SR.INF file, and then click Install

4. Windows will now attempt to reinstall System Restore, and may prompt you for the Windows installation source path. Point to %Windir%\ServicePackFiles folder, or insert your slipstreamed Windows XP (matching the Service Pack level of your system.)

5. System Restore core files will be reinstalled. Restart Windows when prompted.

Notes:

* Alternately, you can reinstall System Restore using the following command line:

rundll32.exe advpack.dll,LaunchINFSection %Windir%\Inf\sr.inf

* Slipstreaming process can be automated using the Freeware AutoStreamer utility. You can download the software from here: AutoStreamer. To do this manually, look for other Slipstreaming guides here.

Mozilla Firefox 3.0 Beta 2


Mozilla Firefox - faster, more secure, easier to use and sporting a new look, this latest Firefox release sets a new standard for web browser innovation. Mozilla Firefox project (formerly Firebird, which was formerly Phoenix) is a redesign of Mozilla's browser component, written using the XUL user interface language and designed to be cross-platform. It is small, fast and easy to use, and offers many advantages over other web browsers, such as the tabbed browsing and the ability to block pop-up windows.


Mozilla Firefox 3 is focused on improved memory handling, performance, and stability, improved XUL, and new core components such as application data stored in SQLite. Mozilla Firefox 3 could break a few existing extensions and applications built on top of Firefox, and it will definitely include new optimizations if you like to build on the popular browser. Mozilla Firefox 3 should have additional JavaScript and SVG features if you're into that sort of thing.


Features in Firefox include:
- Easy migration: Switching to Firefox has never been easier now that Firefox imports data like Favorites, history, settings, cookies and passwords from Internet Explorer. Firefox can also import settings from Mozilla 1.x, Netscape and Opera.
Smaller Download: Continuing efforts to make this the most efficient browser, the Windows version of Firefox is now only a 4.7 MB download, making downloading Firefox a breeze for dial-up and broadband users alike.
New Default Theme: A new default theme provides a bright new look for Windows and Linux users.
SmartUpdate: A new SmartUpdate feature notifies users of new versions of Firefox to ensure that the browser is always up to date.
Help: A new online help system makes this one powerful, friendly browser.
Extension/Theme Manager: New Extension and Theme Managers provide a convenient and secure way to manage and update the hundreds of add-ons that set Firefox apart from other browsers.
ozilla Firefox also includes numerous bug fixes and incremental improvements, including faster page load speed.
- Popup Blocking: Stop annoying popup ads in their tracks with Firefox's built in popup blocker.
- Tabbed Browsing: View more than one web page in a single window with this time saving feature. Open links in the background so that they're ready for viewing when you're ready to read them.
- Smarter Search: Google Search is built right into the toolbar, and there are a plethora of other search tools including Keywords (type "dict " in the Location Bar), and FastFind (start typing the first few letters of some text in the page and Firefox takes you there).
Privacy and Security: Built with your Security in mind, Firefox keeps your computer safe from malicious spyware by not loading harmful ActiveX controls. A comprehensive set of privacy tools keep your online activity your business.
- Hassle-Free Downloading: Files you download are automatically saved to your Desktop so they're easy to find. Fewer prompts mean files download quicker.
- Fits Like a Glove: Simple and intuitive, yet fully featured, Firefox has all the functions you're used to - Bookmarks, History, Full Screen, Text Zooming to make pages with small text easier to read, etc.
- S M L XL XXL XXXL: Firefox is the most customizable browser on the planet. Customize your toolbars to add additional buttons, install new Extensions that add new features, add new Themes to browse with style, and use the adaptive search system to allow you to search an infinite number of engines. Firefox is as big or small as you want.
- Setup's a Snap: At only 4.7MB (Windows), Firefox only takes minutes to download over a fast connection. The installer gets you set up quickly, and the new Easy Transition system imports all of your settings - Favorites, passwords and other data from Internet Explorer and other browsers - so you can start surfing right away.
- A Developer's Best Friend: Firefox comes with a standard set of developer tools including a powerful JavaScript and CSS error/warning console, and an optional Document Inspector that gives unheard of insight into how your pages work.
- Read Mail—Not Spam

Google SketchUp 6.4.112


Google SketchUp is an easy-to-learn 3D modeling program that enables you to explore the world in 3D. With just a few simple tools, you can create 3D models of houses, sheds, decks, home additions, woodworking projects - even space ships. And once you've built your models, you can place them in Google Earth, post them to the 3D Warehouse, or print hard copies.

10 Firefox beginners

Firefox can be real fun for the beginners when you get to know some cool tips and tricks. You can play around with the hot keys and get amazing results. Lets check out the top ten tips and tricks in firefox:

1. Ctrl – 1 or 2 or 3 or 4
Lets say you have 4 tabs opened in Firefox. And you want to go directly to the 3rd tab. You just need to press Alt–3. Hey! It takes you to the 3rd page. In this way Alt-1 will take you to the first tab, Alt-2 to the second, and so forth.

2. Shift – Click a link
If you are working on a page and want to keep the current location while browsing another, use Shift while you click on a link. The new page will open in an another window.

3. Ctrl – T
Ctrl–T launches a new tab in the same window, which comparatively consumes very less memory than a new browser window. For a new window, use Ctrl-N.

4. Ctrl – W
Ctrl–W closes current tab.

5. Ctrl – Enter
Just type in middle portion of a website (without www and .com) and press Ctrl – enter. It will take you to the website. So this way you don't have to type the whole address and still it takes you to the required website.

6. Alt – D
You are on a web page and you want to go to a different web page on the same window. Without even touching the mouse what you can do is just press Alt–D and the exiting URL gets highlighted. You can just overwrite the address there. Bingo!! It replaces by the new page.

7. F11
Press F11 and see the magic. It adds 25% more viewing area to your screen. F11 hides the title bar, menu bar, address bar, and status bar. Press F11 again to get back to the regular view.

8. Backspace
You want to go to the previous page from the existing one? Just need to press the backspace on the keyboard button instead of looking out for the mouse. Makes the job so easy.

9. Ctrl – K
There is an integrated Google search on the right hand side of the address bar. Once you press Ctrl-K you can see the cursor blinking in the Google search bar and you can look for the next web page.

10. Ctrl – D
You like a web page and you want to save it for future reference. You just need to press Ctrl–D and the Add Bookmark page will appear. Just press enter and the page will be saved.

All this just makes your life so easier as a beginner in Firefox.


Make Ctrl+Tab in Internet Explorer 7 Use Most Recent Order

If you have a lot of tabs open at a time, it's sometimes quicker to have Ctrl+Tab switch to the most recent tab instead of the next one to the right. This is the default setting in the Tab Mix Plus extension for Firefox, so a lot of you are probably used to it.

To make Internet Explorer use this behavior, go to Tools \ Internet Options. Click on the Advanced tab.

Check the box for "Use most recent order when switching tabs with Ctrl+Tab". You'll need to restart IE7 for this change to take effect.

Create an Email Template in Outlook 2003

If you have an email you send out every day that contains the same information, or a form that requires users to dictate answers to the same questions - you can create a template in Outlook to help save you time.

The template mode will not be available if you have Word set as your email editor, so the first thing we'll need to do is turn that option off.

Open Outlook Options by choosing Tools \ Options from the menu. Choose the Mail Format tab, and make sure to uncheck the boxes to use Word.

outlook-template_1.png

Now to create our template. Just open a new mail message, choose the person(s) to send it to, a subject line, and a message body. Now you should be able to choose File \ Save As from the menu.
outlook-template_2.png

Choose Outlook Template (.oft) as the file type, and pick a folder and file name to save the template as.

outlook-template_3.png

Now when you go to the location where you saved your template you will have an Outlook Template icon. Just double-click the icon, hit send and you are done! You could also open the template through the File \ New \ Choose Form \ User Templates option as well.

Resolving "Setup did not find any hard disk drives" during Windows XP Installation

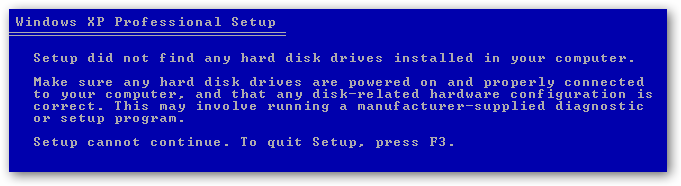
The problem that people keep running into left and right is getting to the point where XP starts to install and getting the message "Setup did not find any hard disk drives installed in your computer". This error happens because your new computer has a storage controller that isn't supported natively in XP, usually an SATA (Serial ATA) controller.

image

If you don't have a floppy drive in your computer (who does anymore), then you'll need to use a process called slip-streaming to integrate the storage drivers into your XP installation CD.

It should go without saying that this is an advanced topic, so proceed with caution.

Creating a Custom XP Install

We'll use a software called nLite to create a new XP install cd, so you'll first need to download and install it. Once it starts up, you'll be prompted for your Windows installation, so you'll want to click the Browse button.

image

First you'll be prompted for the "Windows installation", which really means your XP install CD. Find it and select the root of the installation, and then click OK to go to the next dialog.

image

Next you'll be prompted on where you want to save the temporary files used during the slip-streaming process. I chose to create a new directory and called it XPISO, but you can put it wherever you'd like. I just recommend to use a new directory.

image

nLite will copy all the necessary files off the XP installation and into the temporary folder. When it's done, you'll see all the information on which version it is.

image image

Hit the next button until you come to this screen, where you can select what options you want. Select "Drivers" and then "Bootable ISO".

image

Side note: You can select any of the other options if you'd like. nLite will let you bundle updates, set tweaks or automatically remove components from the installation, but that all goes beyond the scope of this article.

Hit the next button until you get to the screen for selecting drivers. If you click the Insert button, you can choose between adding a single driver or adding a folder of drivers. Since we'll just be loading a single driver, you can choose that option, but you might want to first read the section below about finding drivers for XP.

image image

 Browse to the directory where you extracted the driver files, and then select Open. Note that it doesn't really matter which of the *.inf files you choose, because it will select all files in the folder anyway.

image

 nLite will prompt you to select your driver. If you don't know which exact one it is, you can either use Device Manager in Vista to find the exact model, or you can just select all of them. Just be careful not to select a 64-bit driver if you are using 32-bit, or the wrong OS version. 

image

I would recommend including both Storage and Network drivers, as those are the most common drivers that are missing in XP. image

Once you proceed to the next screen, now we can finally finish the process. You can choose to directly burn the cd here, or you can select Create Image to create an ISO file that you can burn to a CD using whatever burning tool you have.

Note: If you chose to create an ISO, make sure to use the "Make ISO" button before you click Next.

image image


At this point you can burn the ISO image to a CD, and then start your XP installation process.

Finding Drivers for XP

The best place to search for drivers for your hardware is at the manufacturer's support website. The only problem is that almost every manufacturer seems to distribute their drivers in floppy disk image form, even though the computer they are for doesn't have a floppy drive. Guess nobody has alerted them to get with the program.

We can still extract the drivers using an application called WinImage. Let's run through a quick example… Here you can see the Intel SATA controller driver for my HP computer.

image

I downloaded and ran the executable, which extracted a file called f6flpy32.exe into a temporary directory. Don't bother trying to run this one, because it'll just prompt you for a floppy drive.

image

So how to get the drivers out of this file? There are a few options that you can try, depending on how the manufacturer packed the files.

  • You can use Winimage to extract them, which is a shareware software, but you can use it during the trial period for free.
  • You can try and use WinRar to extract the file. In many instances this will extract a *.flp file, which you can mount in a VMware virtual machine or potentially with some ISO mounting software.
  • Some drivers will allow you to automatically extract into a directory. You'll have to try it and see what happens.
  • Other methods? If you've got other ideas, leave them in the comments and I'll add them to this list.

Here's the list of files that Winimage can handle, which is quite a lot.

image

Start WinImage and then open the file, and you should see the contents. Just extract them to a folder, preferably with a useful name so you can remember it later.

image

Good luck with your installation.

Download WinImage from Winimage.com

Download nLite from nliteos.com


iTunes v7.5

iTunes 7.5 features the ability to activate iPhone wherever service is offered and support for Phase, a new interactive music game designed exclusively for iPod nano (third generation), iPod classic, and iPod (fifth generation). This release also includes bug fixes to improve stability and performance.

Apple Safari 3.0.4 for Windows Beta

Experience the web, Apple Style, with Safari - the fastest, easiest to use web browser in the world. With its simple, elegant interface, Safari gets out of your way and lets you enjoy the web - up to 2 times faster than Internet Explorer.
Safari is a web browser developed by Apple Inc. and included in Mac OS X. It was first released as a public beta on January 7, 2003, and a final version was included as the default browser in Mac OS X v10.3. A beta version for Windows was released for the first time on June 11, 2007. Safari also runs on Wine, although the graphics do not display properly.

Changes in Safari 3.0.4 for Windows beta:
* Latest security updates
* Improved stability
* Improved compatibility
* Improved JavaScript and application launch performance
* Resize windows from any side
* New keyboard shortcuts
* Additional font smoothing option
* International text input methods
* Advanced text (contextual forms, international scripts)
* NTLM support
* PAC file auto-detection
* FTP directory listings
* Link to proxy settings from Safari (Safari respects the proxy settings in the Windows Internet control panel)
* Cookie management
* LiveConnect support
* Tooltips
* Spell checking
* Printing page numbers, titles, margins
* For detailed information on this update, please visit this website

Send Large Files via Email with Send6

https://blogger.googleusercontent.com/img/b/R29vZ2xl/AVvXsEjoBeZmFZs1IDTww8beaBpWRvyA6KEwbprkr5Kuh8ezRXEo-NLT4kTVgNRlvb2OXA7dnhH6Dz3SyQfpsYlJsbBt-fY3k3lx-U5237q9orsQ-QCgQ3qVKbuUutwjBtC-5I6UspjSSVGrdA/s400/send6.jpg
Send6 solves a common email problem: it lets you reliably send a large video file, graphics-heavy PowerPoint presentation, or other ungainly file via email.

To use the service, you start by uploading up to six files at a time to Send6 (hence the name) and at the same time specifying 10 recipients who you want to receive the file. The recipients will get a link in their email inboxes with a special URL to download the files.

Everything happens on one page so it's one of the simplest file hosting sites out there. The page design is also extremely clean. There are some limits, however. The maximum file size you can upload is 300 MB, and files are only kept 2 weeks. After that, they are automatically deleted

http://www.send6.com/images/logo.gif
Send large files. Professionally.
http://www.send6.com/

How to INSTALL Flash Player for Linux : A Step by Step guide


The Macromedia Corporation has always been very lousy at offering their product to the Linux community. One of the supposedly supported softwares is the Flash Player for Mozilla based web browsers.

Since Macromedia Flash Player is not open source, most of the Linux vendors avoid embedding the Flash Player in their distribution. The aim of this ‘How-to’ is to teach you to enable the Flash Player in your Linux distribution, if it’s not already enabled. As far as I can remember, from the most popular distributions, the only one that integrates Flash Player out of the box is SuSe.

If you want Flash support in your distro, you should go to the Macromedia website and get the latest Flash Player for Linux, and that is version 7. This is pretty disappointing, because Macromedia has released version 9 for Windows, while for Linux time stood still regarding this matter. After downloading it, you have to extract the files from the archive. In the newly extracted director, you will notice 5 files, of which only libflashplayer.so and flashplayer.xpt will be required, so keep this in mind.

Because distributions organize their directories differently, you will have to locate the directory in which your Mozilla-based browser holds its plugins. To do so, open a terminal and use "locate mozilla" or "locate firefox", so you can figure out where those browsers are holding their plugins. At the beginning of the list displayed by the "locate” command, you will see a line similar to /usr/lib/mozilla-1.7.13/plugins/ that shows where you should copy the two files mentioned above. This path is available for the Fedora distribution and is very likely to be different when using another distro. If you are using Firefox, don't forget to put the Flash Player plugins in the correct location. The default path that distributions should use is /usr/local/mozilla/plugins. This might come in handy if you’re lucky and your Linux vendor respects the standard.

To make the plugins work with your Mozilla browser e.g. Konqueror, you have to go to its configuration window, in the plugins tab. There you will see a section for Netscape plugins and you’ll have to press the Scan button. After doing so, you will see in the plugins tab that Flash Player was installed.

Last but not least, you should know that in the Flash Player archive that you’ve decompressed, there is a file named flasplayer-install. This is supposed to be a shared script that is able to install the player. Sometimes it works, but sometimes it doesn't; therefore, I’ve described this do-it-yourself method. Hopefully, you will now be able to enjoy some content-rich, nicely designed Flash websites.

OpenSource Tool to get all Windows Passwords?

Ophcrack is a tool that is able to quickly display Windows account passwords using Rainbow Tables instead of brute forcing the passwords. While it could take years to bruteforce a password that uses letters, numbers and special chars it takes only minutes to do so with Ophcrack.

Features

  • » Runs on Windows, Linux and Mac OS X (intel).
  • » Cracks LM and NTLM hashes.
  • » Free tables available for alphanumeric LM hashes.
  • » Loads hashes from local SAM, remote SAM.
  • » Loads hashes from encrypted SAM recovered from a Windows partition.

Ophcrack can be downloaded with several different table sets. The default live cd is able to reveal passwords with alphanumeric chars only. If no passwords are revealed using this method you should download different table sets which support other chars as well.

Two additional table sets can be downloaded from the Ophcrack website. The first is 720 megabytes and should only be used on machines with at least 500 megabytes of ram. A smaller one with only 388 megabytes can be downloaded for machines with less than that amount of ram.

A new version of Ophcrack was released just four days ago. (Ophcrack 1.1.4)

How to dual boot Windows Vista and Linux Ubuntu?

Many a times, Windows users that want to give Ubuntu Linux a try and don't want to give up their Windows system. So in such cases they can always choose to have them both in the same machine.
And this also applies for people that need both Windows and Linux on the same PC for business purposes. A dual boot machine has either multiple hard disks or multiple hard disk partitions, with each partition or drive containing an operating system. Now there are different methods to achieve a correct dual boot system, it's your decision which one you want to give it a try. I will outline two methods to achieve this.

Method 1: The easiest method

You can choose the brand new Ubuntu/Debian Installer for Windows machines. The aim of this installer is to provide an easier way for a Windows user to install Ubuntu Linux without having to know how to repartition the disks or to set up a multiboot system.

Note: With this installer, you can also choose to install Kubuntu (Ubuntu with KDE desktop) or Xubuntu (Ubuntu with XFCE desktop).

Method 2: The Geek way

1. Make sure your Windows partition is defragmented and backup any important data.

2. Boot from the Ubuntu Desktop CD, double click on the Install icon on the desktop and follow the normal installation instructions. When you arrive at the Partitioning screen, select the option that let's you resize IDE1 master, partition #1 (hda1) and use the free space.

Note: Remember that IDE1 master, partition #1 (hda1) represents the First partition on the First hard drive.

The partitioner will ask you how much space you wish to distribute to Linux partition, just enter the desired amount of space (I recommend around 5-6 GB). Continue with the installation.

3. After the installation is over, reboot the machine and you will be able to select from Windows or Ubuntu at boot time.

wikidPad - The best Open Source Note Taking Application

WikidPad is a wiki-like notebook for storing your thoughts, ideas, todo lists, contacts, or anything else you can think of to write down. What makes it different from other notepad applications is the ease with which you can cross-link your information. Links in a wiki are created by typing in WikiWords. A WikiWord is any case word (also called CamelCase) typed into the editor. TodoList or JohnDoe are example WikiWords. The term wiki means "quick" in Hawaiian, and wikis are all about quickly linking your information together. Wikis are not a new concept, in fact there are many web based wiki servers available.

wikidPad is a real-time wiki
wikidPad is not a web server, or application server, or groupware solution. wikidPad is a standalone notepad like application, albeit notepad on steroids. wikidPad is like an IDE for your thoughts.

IDE for your thoughts
Software developers have grown accustomed to certain features from their integrated development environment that make their jobs easier. Features like auto-completion, outline views, incremental search, easy source code navigation. IDE's that provide these features can greatly increase developer productivity. wikidPad attempts to utilize some of these features to address the problem of personal information management.

Personal Information Management
How do you manage all of the random bits of information in your personal and professional life? Word documents, text files, Microsoft Outlook folders/notes. If you're an expert user maybe you have a weblog, or a personal database, or possibly an outlining application. Where do you track your wifes favorite food, your bosses kids names, your personal todo list, the name of the movie you just read a review of, the name of the book a friend recommended. wikidPad was created to address this issue of personal information management. It provides a place to manage the massive amounts of information you have stuffed in your head, on stickies, or on your computer.

WikidPad Features
  • On the fly WikiWord linking, as you type
  • WikiWord auto-completion
  • Easy WikiWord navigation
  • Wiki text styling
  • WikiWord History
  • Wiki document attributes
  • Dynamic views
  • Tree/Outline view with over 100 icons
  • Todo lists
  • Incremental search
  • Search and Replace
  • Autosave
  • Export to HTML
  • All your data is stored in plain text
  • URL and file linking
  • Intuitive keybindings
  • Help Wiki included
Download this cool Freeware at : http://www.jhorman.org/wikidPad/

Microsoft to sell Ubuntu Linux via Dell


Dell had announced last week that it will make available machines preloaded with the Ubuntu 7.04 distribution of Linux. In this context, Dell will offer desktops with Windows Vista, Windows XP and Ubuntu 7.04. Dell has chosen to respect customer responsibilities trading off relationships with long time partner Microsoft.

However, Dell has become the first major systems provider worldwide that has jumped on the Windows and Linux interoperability wagon put together by Microsoft and Novell. Of course that intellectual property (IP) assurance is delivered inherently with the interoperability agreement between the two platforms.

Microsoft revealed that it will sell Dell SUSE Linux Enterprise Server certificates, and that the U.S. computer manufacturer has agreed to implement a services and marketing program designed to help non-Dell Linux customers transition to SUSE Linux Enterprise Server.

Dell is the first major systems provider to align with Microsoft and Novell in this collaboration, and we intend to lead in this space. This move is a huge success for the industry and, more specifically, for customers who haven’t purchased Linux through Dell and who want to migrate to SUSE Linux Enterprise Server for the IP assurance and interoperability benefits.

Dell’s embrace of the Novell-Microsoft agreement reflects a growing market reality: The two platforms of the future are Linux and Windows, and customers want them to work better together. Novell continues to grow our SUSE Linux Enterprise business because we are addressing customer needs. Dell recognizes this, and we are proud to have them as a customer and marketing partner to help spur continued adoption of SUSE Linux Enterprise.

Tor the Best solution to Surf the web Anonymously for FREE

Tor is a toolset for organizations and people that want to improve their safety and security on the Internet. Using Tor can help you anonymize Web browsing and publishing, instant messaging, IRC, SSH, and other applications that use the TCP protocol. Tor also provides a platform on which software developers can build new applications with built-in anonymity, safety, and privacy features.

Communications are bounced around a distributed network of servers, called onion routers. Instead of taking a direct route from source to destination, data packets on the Tor network take a random pathway through several servers that cover your tracks so no observer at any single point can tell where the data came from or where it's going. This makes it hard for recipients, observers, and even the onion routers themselves to figure out who and where you are.

Tor's technology aims to provide Internet users with protection against "traffic analysis," a form of network surveillance that threatens personal anonymity and privacy, confidential business activities and relationships, and state security.


I have nothing to hide but that doesn't mean I don't have things of value to third parties - everyone from google up is gathering information I don't want them to from my online activities or my personal information, and selling them off. When at home I sometimes leave my PC on as a node, thinking that maybe I am helping someone get information their government is censoring.

You can download and set it up by visiting Tor's Official Website.