Google Docs in Offline mode

The feature we have all been waiting for is finally here. Google Docs is now available in a special Offline mode with the aid of Google Gears which will allow users to edit their Google Docs documents on their computer even if they are not connected to the Internet.

Google Reader was the first contender in the Google family of products and services to use Google Gears technology for offline reading and since then everyone has been in high hopes for Google Gears to integrate into Google Docs.

google-docs-offline.jpgGoogle Gears is basically a browser plugin which saves a local copy of data while in offline mode (when not connected to the Internet) and then syncs it online as soon as the computer is connected to the Internet. This will now enable users to use Google Docs for most of their work without requiring an Internet connection.

This feature is slowly being rolled out to all Google Docs accounts so if you want to know if you are ready to try it, just look on the top right menu for a link called "Offline" and make sure your browser has Google Gears installed.

I discovered Google Docs long ago but started making actual use of it recently when I constantly wanted to read, write and edit documents from my home, university or any other place. Google Docs may still not be the best alternative to Microsoft Office as it lacks a lot of advanced features but is still useful if you need a good, light and portable document processor.

How to quickly view the size of a folder in Windows Explorer

is tutorial will show you how to view the size of a folder, and all of its contents, in Windows Explorer.

  1. Start by downloading FolderSize, which is not only free, but open source - and available in 32 and 64bit versions (if you're not sure which version you want, you probably want the 32bit one). To install, you'll click next a few times, OK once or twice, and then it's done. Now open an instance of Windows Explorer and select View -> Details.
  2. foldersize for windows explorer

  3. Right-click one of the column titles (Size, Type, Date Modified - it doesn't matter) and select Folder Size.
  4. foldersize for windows explorer

  5. Now you'll have a column that displays the size of the contents of each folder.
  6. foldersize for windows explorer

  7. You may want to remove the Size column, as it's now made a bit redundant. To do so, just right-click one of the column titles, and remove the check from the Size entry.
  8. foldersize for windows explorer

  9. Drag the Folder Size column to wherever you want it to appear in Windows Explorer (the order it appears vs. your other columns).
  10. foldersize for windows explorer

  11. Folder Size even includes a set of preferences you can set from the Control Panel.
  12. foldersize for windows explorer

  13. For example - you can switch to Compact which makes calculating the size of a folder even easier (particularly a large folder).
  14. foldersize for windows explorer

  15. The Service tab of the Folder Size lets you start and stop Folder Size - you can even pause it if you're doing hard disk intensive operations and don't want Folder Size to slow things down.
  16. foldersize for windows explorer

How to open Office 2007 documents using Office 2000, 2003, or Office XP

Having problems opening Office 2007 documents because you still have an older version of Office? By installing the Compatibility Pack from Microsoft in addition to Microsoft Office 2000, Office XP, or Office 2003, you will be able open, edit, and save files using the file formats new to Word, Excel, and PowerPoint 2007. The Compatibility Pack can also be used in conjunction with the Microsoft Office Word Viewer 2003, Excel Viewer 2003, and PowerPoint Viewer 2003 to view files saved in these new formats. For more information about the Compatibility Pack, see Knowledge Base article 924074.

 The MS compatibility pack can be downloaded here.

Adobe Photoshop Express- Free Web Based Photoshop

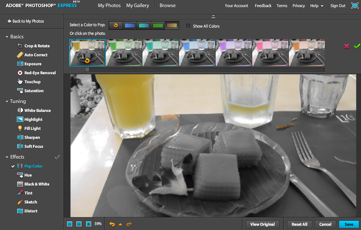
Adobe has launched an online version of its popular software Photoshop. The online version is named Photoshop Express and is a free service. Photoshop Express allows users to store up to 2GB of images, make edits to their photos, and share them, all online. This tool may not have all the features of Photoshop, but it has basic features needed to edit photos.

photoshop-express-thumb.png

Another good feature of this tool is that you can reverse the changes made to the photos just like Photoshop. You can use any of the 17 editing tools to modify your images.

photoshop_express.png

Photoshop Express also includes features that let you choose how to view and share photos. You can group your photos into albums or slideshows and a gallery feature lets you gather together your Web-based albums and slideshows. You can also change layouts, add captions, and email images or albums to family or friends.

Users will also be able to integrate with social networking sites like Facebook. Photoshop Express works with all major browsers, including Firefox, Internet Explorer and Safari, Adobe said. It requires an Internet connection and Flash Player 9 to work. There is also a test drive in case you want to try it before joining.

The limitation of this service is that only Jpeg files can be edited at present and also only 2GB limit for photo storing.

Photoshop Express Home Page | Test Drive

Windows Mobile Call Firewall

CallfirewallshotWe are often slaves to our mobile phones, jumping to attention whenever a call comes in. Wouldn't it be a nice change to have some peace and quiet every now and again?

Call Firewall may help you control who you speak to. It uses caller ID to detect if a caller is someone you want to talk to, at that time.

Call Firewall is extremely easy to operate. There are numerous modes that you can predefine.

  • Accept all calls
  • Accept calls from My Contacts only
  • Reject all calls
  • White List – Accepts calls from contacts in White list
  • Black List – Accepts all calls apart from blacklisted contacts

You are even able to respond to rejected callers with a predefined SMS. It sits in the background doing its job, allowing you to get on with whatever you were doing before you were interrupted.

Call Firewall runs on Windows Mobile devices and is available for free from Logic Unlimited.

SlideRocket: Design Quality Presentations Online

[SlideRocket Logo]A lot of us use presentations made from either PowerPoint, Google Docs, or other applications. Most of these apps work fine but I think you'll be interested in this next one.

SlideRocket is a web application that lets you design and manage your presentations, as well as allowing you to share libraries of slides and assets.

Let's take a closer look at SlideRocket.

The interface has that "web app" look but that's a good thing. The layout is well-organized with the various tools easily accessible.

[SlideRocket Screenshot 1]

The integrated library provides access to all your presentations, slides, assets, including shared objects from people in your group or company. There's also a community resource available for those looking for more materials.

You can import your own images, flash movies, and even your own videos. You can also search through the community's clipart or import images and videos from Flickr and YouTube.

You have access to a number of effects and transitions including drop shadows, glow, reflection, 3D rotation, etc. Animations include motion blur fly-in, decoder, sparkle, flash, materialize, cube rotate, reflection, swap, and flip.

Need to add some tables and charts? No problem. SlideRocket comes with shapes and drawing tools for annotations and diagrams, as well as customizable tables and charts.

[SlideRocket Screenshot 4]

If you need to share your presentation, you can send a URL or embed it in your site. If your presentation is confidential, you can send invitations to specific people. SlideRocket has an integrated remote meeting function that lets you invite a number of people to view your presentation while you control it.

Stats junkies will be happy to know that they can view statistics about their shared presentations like how long people spent on different slides, and who viewed it.

[SlideRocket Screenshot 5]

SlideRocket is still in beta but you can head over to the site right now and sign up for the beta.

Get a list of all recently accessed files with RecentFilesView

Recentfilesview ScreenshotRecentFilesView is a small, no install freeware program that can retrieve and save the list of the most recently accessed files.

If you've ever needed a list of the last opened files on your machine, RecentFilesView is for you. It provides a much more comprehensive list than the one in the "Recent Documents" folder. Here are some scenarios I could think of where you wil find this program very useful:

  • If you are working on a project and for whatever reason need to create a list of all the relevant files for that project. With RecentFilesView you can export a comprehensive or partial list to a text or CSV files and edit that as needed.
  • If you are uncertain as to which files or file versions you were using when you were working on a project 5 days ago. With RecentFilesView you should be able to survey that history in a snap.
  • Please post other uses you might think of in the comments.

Here are more notes on this app:

  • Sorting: you can sort by created time, modified time, executed time, and filename.
  • Which files will be listed?: those files that were either opened from the desktop or from an application. It will list folders that were opened as well.. It will display your file activity, not files that were created or accessed by programs, such as temp files or cached files saved by your browser. Files that are deleted will also be listed, although it will indicate in the list that the file is no longer available.
  • Where does it get the list from?: from recent folders and the registry. More info on this on the program page.
  • How far back will it go?: I've been using this program for about three days, and the list of files, which goes back 10 days, is at 158 and keeps growing whenever I access a new file. I do not believe that the program is saving this list but is rather retrieving it every time.
  • Exporting: save your list as a text, CSV, XML, or HTML file. You can select a sub-set of file using CTRL or Shift selecting and export only the entries you are interested in.
  • No install program: just unzip and use.
  • Command-line use: if you need to, you can use RecentFilesView from the command line.

The verdict: a very nice, simple program that does what it does very well. I imagine that for those who need a program like this RecentFilesView will be a very welcome addition to their set of tools.

Version Tested: 1.05

Recent Files View

Remove Excel Passwords with Excel Password Remover 2008

Excel password remover 2008 is a FREE Excel add-in that removes/cracks sheet and workbook password protection in Excel. This add-in works fine in Excel 5.0 and above (including Excel 2000, XP and 2003). This program will remove passwords of any length, also passwords containing special characters.

How to unprotect Excel sheets?

1. Run the add-in and it gives you two extra menu-items on the "Tools"-menu.
2. These are; Unprotect workbook and Unprotect sheet.

NB: This program can't remove file protection, i.e. if you are unable to open the file, this program won't help you.

Download Excel Password Remover

Force Windows to Boot Into Safe Mode Without Using the F8 Key

So you are reading instructions on some article that tells you to reboot into Safe mode. You ask how you do that, and are told to use the F8 key when the computer boots up. But you just can't seem to get the F8 key to work… so how do you boot into Safe mode?

There's an option in the well-known System Configuration utility that will let you force Windows to always boot into Safe mode… until you turn the option off.

Note: While this method is nothing new, I have to give credit to reader Larry for mentioning it in a comment and prompting this article. Thanks, Larry!

Force Windows to Boot into Safe Mode

Open up the start menu search or run box, and type in msconfig and hit the enter key.

image

Select the Boot tab, and then check the box for "Safe boot" and make sure the radio button below is set to "Minimal".

image

Once you hit the OK button you'll be asked if you want to Restart now or wait until later. Either way, the next boot will take you into safe mode.

image

Once you restart, you'll realize that you are in Safe Mode because it not only places that text in the four corners of the screen, but it even opens up the safe mode page from the help file in Vista.

image

Now you can work on getting rid of that spyware…

Turn Safe Mode Back Off

Once you are done fixing whatever you were working on, you'll probably want to turn safe mode off and go back to normal mode. Just open up msconfig the same way as above, and then on the Boot tab you'll uncheck the "Safe boot" checkbox.

image

This method especially helps if you need to repeatedly boot into Safe mode.

System Protect

system protect

System Protect is free, easy-to-use software that helps keep your operating system stable and protect important programs, documents and files from deletion caused by viruses, other users on your computer such as your kids, or even by your own mistake.

Features:

  • Files & Folders Protection
  • Protection of Selected Files
  • Stable Operating System
  • Protection for All Users
  • Multilanguage Support
  • Automatic Updates
  • Easy to Use, Easy to Setup
  • Free Support

Publisher : Visit Website

DOWNLOAD NOW (4.80 MB)

The Easy Way To Run Your Own File Server

We've all thought about running our own file sharing server for our own network of friends. We don't actually go through with it since running a file server is not for the average computer user. For those of you looking for an easy way to run your own file sharing server, this should help you out.

HFS (HTTP File Server) is a free application that lets you run a file server without having to install anything. The program is just one executable file. No need to install anything, just run it.

[HFS Screen Shot 1]

Just drag and drop any file you wish to share into HFS and you're good to go. You can monitor all connections from the tray icon, specify the IP address, and define which port you want the server to run on.

[HFS Screen Shot 2]

HFS runs on all Windows versions and can run with Wine under Linux. Shared files are presented in a simple HTML page for your friends, although you can customize the page template if you want it to look differently. HFS is also capable of integrating with Windows Explorer so you can share any file with just a right click.

For those who are interested, here's the HFS FAQ and the HFS Guide.

Google Code University

Google Code University is an excellent resource for Computer Science students and programmers in general. All videos and Powerpoint presentations published at the University are released under Creative Commons. Four different kinds of courses are available right now, they are Ajax Programming, Distributed Systems, Web Security and Languages.

Each section is divided into two subsections that link to the presentations and videos. The Powerpoint presentations have to be downloaded to your computer while the videos are embedded on the website itself. Most tutorials on the website are clearly aimed at users with some background knowledge.

If you take a look at the C++ tutorials in the Language section you see that they are not beginners tutorials for instance. The first tutorial is named C++ Threads while the second and last New Features in the Next C++ Standard. Nothing a beginner to C++ programming would want to start with.

The videos however are excellent, the C++ Threads video for instance has a playtime of 1 hour 29 minutes. Strangely though the other video which was hosted on Youtube is not available anymore which is the only video that was not available. All other videos were hosted on Google Video and ran fine.

The website has a Curriculum Search as well which should help to find teaching material. It's basically a custom Google search.

Download Apple Safari 3.1 (World’s Fastest Browser)


apple_safari.jpg

Apple has just released the new version of its Apple Safari 3.1 browser which claims to be the World's Fastest Browser. Apple Safari 3.1 claims to load web pages 1.9 times faster than IE 7 and 1.7 times faster than Firefox 2 and also boasts a six time greater javascript loading speed than any other browser.

I was not a fan of Safari until I got to experience it myself. I have been using it for past some months on my iPod Touch but a lot of friends suggested me to use the Apple Safari for Windows as according to them it gives the best browsing experience.

It is indeed true! Apple Safari is for users who want enjoy Surfing the web with elegance and pleasure while Firefox is for the addons-obsessed users and IE is for people who just want to have fun out of the different errors that IE renders time by time.

apple-safari-loading-speed.png

Except for providing a good browsing speed, the new Apple Safari also supports CSS animations and HTML 5 audio and video tags which are still far away to be seen.

Give it a try and I promise you will never be sorry. Download Apple Safari 3.1


Windows Vista Service Pack 1 Five Language Standalone

Windows Vista Service Pack 1 (SP1) is an update to Windows Vista that addresses feedback from our customers. In addition to previously released updates, SP1 will contain changes focused on addressing specific reliability, performance, and compatibility issues; supporting new types of hardware; and adding support for several emerging standards. SP1 also will continue to make it easier for IT administrators to deploy and manage Windows Vista. Windows Vista Service Pack 1 Five Language Standalone version can be installed on systems with any of the following language versions: English (US), French, German, Japanese, or Spanish (Traditional).  

Wave0 = Only 5 languages JAP-FRE-SPA-ENG-GER

Wave1 = 36 langues (available to download on april 9)

UltraDefrag, Defragmentation Utility for Windows

ultragefragUltraDefrag is an open source defragmentation utility for windows. It works faster than the native Windows defragmenter tool. Ultradefrag comes with three interfaces, graphical, console and native.

Features

  • Very fast defragmentation, the work is done via a kernel mode driver which has an optimal defraging algorithm.
  • Very small engine written in pure C.
  • Nice graphical interface - compact and functional.
  • Safety, because the file moving is accomplished with Microsoft's own Defrag API.
  • Ability to generate html reports of fragmentation status.
  • Ability to include/exclude files based on simple filters.
  • Native x64 support.
  • Free: Distributed with full source code under the GNU General Public License.

UltraDefrag is freeware released under Open source GNU license. It works with Windows NT 4.0, Windows 2000, Windows XP, Windows Server 2003,Windows Vista and all of the 64-bit editions of Windows.

It is quite fast than the windows defragmenter.

Download Ultradefrag from here

Recover deleted files with Pandora Recovery

Sometimes we may delete an important file by mistake, but there is no easy way to recover these files till now, now Pandora corp has come up with a tool which can recover these deleted files from the hard disk. Pandora Recovery is a free tool to recover deleted files from your computer. When we delete files from the system they will disappear from the system, but they are still there in the hard drive. This tool recovers files deleted with shift+delete or recycle bin cleared files. Pandora recovery can recover music, images, documents etc regardless of the file type.


Pandora recovery tool rcognizes NTFS file system for recovery of the deleted files. This tool scans the computer and makes a searchable index of the files on the hard disk. With the built in search functionality one can search for files with full or partial names, file types, file sizes or with creation or last accessed dates.


How it works

When you delete a file on from the system, its content is not erased from disk but only reference to file data in File Allocation Table or Master File Table is marked as deleted. That means you might be able to recover deleted files, or make it visible for file system again.

Pandora Recovery also supports preview for some image and text file types.

Currently you can preview files having several image file types (BMP, GIF, JPG, PNG, ICO,TIF, TGA, PCX, WBMP, WMF, JP2, J2K, JBG, JPC, PGX, PNM, RAS, CUR) and several text file types (TXT, LOG, INI, BAT, RTF, XML, CSS).

Pandora Recovery is compatible with Windows Vista, XP, 2003 and 2000.

Download Pandora Recovery from here

Sync Google Calendar With Microsoft Outlook Calendar

Google Calendar SyncIf you use Google calendar and Outlook Calendar at different locations like one at work and one at home, it is cumbersome to update both of them to have the same information on both of these tools. Google introduced a small utility for syncing Google Calendar with Outlook Calendar that makes your life easier.

Google Calendar Sync is a 2-way syncing application between Google calendar and Outlook calendar. You can change the 2-way to 1-way sync either from Google calendar to Outlook calendar or from Outlook Calender to Google Calendar. The default sync time is once in 2 hours, but you can change that too.

Calendar Sync Google Calendar sync utility will sit in the system tray after installing, you can access it with right click to change the options, it syncs automatically at specified time interval.

Download Google Calender Sync from here

Installing Windows Vista with a Virtual CD/DVD Drive

  • Download the desired ISO image and save it to an easily accessible location on your hard drive.
  • Download the Virtual CD-ROM Control Panel for Windows XP. It's an executable archive that contains 3 files: VCdRom.sys (the virtual cdrom driver), VCdControlTool.exe (the control panel application), and a readme file. Extract those files somwhere handy and run VCdControlTool.exe
  • Click "driver control," "install driver", then browse to and select the VCdRom.sys file. This loads the driver for use in Windows.
  • Close the driver control window.
  • Click "add drive" to obtain an available drive letter for your virtual drive. That drive will appear in the list at the top of the control panel with the message "no image mounted."
  • Click "mount," then browse to and select your ISO file. The file will be mounted as a virtual drive at the drive letter you specified.
  • You can now use this new virtual drive as you would a regular DVD drive to install Vista however you'd like. VirtualPC recognizes these virtual drives, but you can also install Vista from within WindowsXP if you'd like.

Windows Vista : Use your flash drive as RAM!

Till this date, Microsoft's windows had two options for the memory requirement of the computer, so that the computing can be done at cheaper rates and that too without installing the physical memory.

1. Physical Memory (RAM)
2. Page File (A virtual memory file, stored on hard disk).

The page file is used by the Windows OS to cater the needs of various applications when the physical memory is fully used up. The reason for that is, that Virtual memory is slower as compared to the physical memory and thus Physical memory takes the first priority.

However, with the release of Windows Vista, Microsoft has introduced a new technology called ReadyBoost. With the help of this technology one can use any Flash drive, SD Cards, CF Cards as the third memory option for the computer.

Now, the benefits of Flash Drive or Cards as a source of Memory :

1. It is faster than the virtual memory which is accessed through the hard disk drive.
2. It is cheaper as compared to the actually Physical Memory.

How can it be activated ?

In order to activate the ReadyBoost technology on your FlashDrive or Memory Cards, you have to follow these steps…

1. Open My Computer.
2. Right Click on the Removable Disk Drive and select Properties.
3. Click on ReadyBoost Tab.
4. Enable the feature by selecting the option and allocate the amount of space you want to use as memory.

Things to be noted….

1. Regardless of the fact that you use Readyboost or not, you need at least 512 Mb of memory to run Windows Vista decently.
2. If your device is not giving the option of ReadyBoost then it means that it doesn't clear up the minimum data trasfer rate required by ReadBoost technology.

How to Enable Multiple Instances of Winamp

There may be instances where you wanted to open a video file while playing a mp3 file. By default Winamp allows only single instance of the player and hence the mp3 files will be replaced with the video file. This means that you need to play video file using other software like Windows media player.However Winamp allows you can easily configure Winamp 5.X to allow multiple instances, allowing you to play a video and audio file simultaneously.

logo.gif

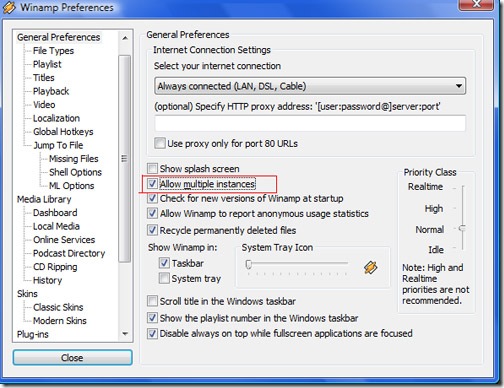
'The configuration settings are very simple. Right click on the Winamp's title bar an select Options-> Preferences. This will bring up the preferences Window. In this select the General Preferences tab. In the right pane select the box "Allow multiple instances". Now close the dialog box and you can run a video and audio file simultaneously.

winamp

NB: Note that this feature is available only in Winamp 5.X versions.

Networking: DynDNS


DyndnsDynDNS is a great service which lets you connect to your home computer or network, without having to know the IP address. You are able to use a word domain name instead, such as name.dyndns.org.

Once you sign up, which takes less than 10 minutes, you can setup the service to a domain name you like, and which you can remember. This domain name will then be associated with your home IP address.

When you are out and about, you can type this address into any number of Internet programs, depending on what you have setup on your network. Eg. If you want to use remote desktop on your home PC, you would type in the domain name into your remote desktop client. DynDNS will forward you through.

What makes DynDNS particularly useful, is that if your home IP changes, either a desktop update client or your router will tell the DynDNS servers update your IP on their records. Many routers have the option to enter in some dynamic DNS settings. You will never have to remember your home IP address again.

If you are connecting to through a router, you will need to setup port forwarding, so that your router will know which computer it should send you to for any of the services you want to use. Check this link for an extended list of ports.

DynDNS opens up a whole bunch of of doors for you. You can setup your home computer as a web or FTP server and connect to them easily. I love this service.

Create your account for free at dyndns.com. They have been around for a long time, but they can never be over promoted.

Outlook Add-in: Outlook Duplicate Items Remover 1.2

OdirPOP email servers are not as smart as IMAP, Exchange or online email services. They are unable to keep track of what mail you have already downloaded, when you are moving between computers or when you have just reinstalled Outlook (if you have imported a backup). This is not normally a problem in day to day use, but when you do make changes to your email account settings, you can end up with duplicate items, and a lot of them.

It is a real hassle to remove each of these duplicate items individually, and in the past I have manually removed them. Today after a fresh install of Outlook, I had around 150 duplicate items! I needed to find a better way to automate the removal of these. I came across a number of utilities that would do the job. Some of them are free and others are commercial or shareware releases. After a bit of testing Outlook Duplicate Items Remover (ODIR) came out on top.

ODIR scans your Outlook mail, contacts, tasks and calendar for duplicate items. If an item is found to be a duplicate it moves the item into a folder called ODIR Duplicate Items. You can then look through this folder and then delete it's contents once you are comfortable that you don't need any of them.

There are a number of reasons I preferred ODIR over the other utilities I tested out. First of all, it is free which is always a big selling point for me. ODIR had fewer options than many of the others, but in the end I felt most comfortable using it as it did not automatically delete duplicate items (as most of the others did). Instead, ODIR moved them into a separate directory which I could quickly sift through to confirm that no legitimate mail was removed.

If you find yourself in the same situation, do yourself a favour and download ODIR. It is so quick and easy to use, making this huge hassle a piece of cake.

ODIR is available for free from Vaita. Tested on Outlook 2007 in Vista.

Sync Your Files with Windows Live FolderShare

Windows Live FolderShare is a great, easy way to keep your files synced between multiple devices. With FolderShare, you create a private peer-to-peer network that syncs your files and lets you share them with colleges and friends. You no longer need to worry whether your files, photos, or videos are on your home PC, your laptop, or your work computer. FolderShare keeps them all in sync, letting you access them from any computer set up with FolderShare or any web browser - even the browser on your mobile device! Files can be up to 2 GB in size, there are no limits on the quantity or size of files transferred, and all file formats are supported. 

The software's sharing feature is an easy way to send others large files - no more trying to zip files to get them through email, burning to CD/DVD, or uploading to a website. To use FolderShare, you must download and install the FolderShare Satellite - the software that is installed on the device(s) you want to sync or share files with. This software runs in the background and automatically updates your files on the other connected devices. The software, part of Windows Live Services, works on Windows 2000, XP, Vista, or OSX and it's completely free! FolderShare can be downloaded here.

How to change Laptop settings to Shutdown or Hibernate when you close the lid?

This tip applies to Windows Vista. From the Control Panel -> Click Hardware and Sound -> Choose Power Options. (You can also access this from the battery shaped icon from the system tray)

From the left side list, find Choose what closing the lid does

make laptop to shutdown when you close the lid

Here change the settings that you prefer. You can choose from Do Nothing, Sleep, Hibernate or Shut Down. Also if you prefer to have different setting while your laptop is connected to power supply, you can do so by choosing different options under On battery and Plugged in.

Also you can similarly change the setting of the power button or sleep button to shutdown or hibernate.

Why do I get a BSOD when I moved my hard drive from one machine to another?

Windows 2000 and XP produces a blue-screen of 0x7b after you transfer a Disk from one motherboard to another. The reason for it, is the difference in the IDE Disk controller.

Windows will only boot successfully using the same IDE controller of the same manufacturer (i.e. Intel, VIA etc..). It's not that the Windows plug'n'play mechanism can't handle the change, but that Microsoft doesn't really want us to take one Windows from an old system and move in to a new one. so logically it is programmed to produce an error message.

To successfully make the change, you have 3 options to choose from:

  1. Run a Repair installation to make Windows reinstall on its hardware.

  2. Find a new motherboard that contains a chipset from the same manufacturer.

  3. Run the following cool procedure.... :))
Thankfully, there's a working workaround straight from Microsoft's Knowledgebase (KB314082). What we will basically do is to tell Windows that it already "knows" all of the generic IDE types from all vendors. that way, when it will boot up, it will only install the new hardware and not refuse to boot because it is missing the old one.

The procedure described in the article takes you through extracting some drivers from the I386 and importing some registry data from a text file to the system.

But as you all already knows- I like Automation!!

so I've writen a script called UpdateIDE that checks whether you run it on a Win2000/XP/2003 and does the patching needed for the HD relocation.

What you basically need to do is:

1. Run the script while the disk is still installed on the original machine.

2. Shutdown, Relocate the disk to the new system & boot.

3. Windows will do it's hardware recognition magic and you're up & running :)
While working in Microsoft's IT team back in 2002, I've used this tool to create a master Ghost image that I could deploy on all the laptops brands & models we've had to support.

But What Can I do if my old Motherboard is Dead?

If you can't run the script on your original machine beforehand, we'll have to you another working system.

1. we'll connect the drive as a secondary disk on a working machine (so it will appear as drive "D" for example....)

2. we will have to make the file copying manually. according to your Windows version (2K/XP), copy & rename these 4 files as follows:

  • atapi.xp --> d:\windows\system32\driver\atapi.sys

  • pciide.xp --> d:\windows\system32\driver\pciide.sys

  • pciidex.xp --> d:\windows\system32\driver\pciidex.sys

  • intelide.xp --> d:\windows\system32\driver\intelide.sys
* The d: stands for the drive letter as it appears on your system.

3. Using RegEdit, we will load the System hive of the drive we've connected, and we will import the registry data to it.

a. open RegEdit, stand on Local Machine.

b. in the File menu choose "Load Hive". now browse and select the file:

d:\windows\system32\config\system.name it as "OldSys". it will now appear as another hive in Regedit.

c. to import the registry data found in the file Merge.xp (or merge.2k) we will first need to update it to fit the new situation:

Open the file Merge.xp using Notepad. Run a Find & Replace from "\SYSTEM\" to "\OldSys\"

Now save the file as: Merge.reg

Double-click on it to make the actual import process.

d. when finished, stand on the "OldSys" hive and choose "Unload Hive" from the File menu.

That's it! now replace the drive into your new system and boot to victory!Note: if you're changing your system from and old IDE drive to a brand new SATA drive, this procedure can only work if your Bios can turn off the "SATA Native mode" and emulate it to be recognized as an IDE.

Block Unwanted Scraps in Orkut Scrapbook

Orkut

Oh my God! I never thought Orkut would even give consideration to the feature that they have finally implemented now. Orkut was always looked down upon when compared to other social networking websites due to its low privacy features and security holes which could get your Orkut account hacked or even cause you to lose some very personal information but the recent addition of a new feature to the Orkut system shall now ensure that Orkut will be safe enough to compete with other social networks like Facebook and MySpace.


How To Block Unwanted Scraps on Orkut

Orkut Privacy

"Friends and Friends Only Scraps" (Thats what I call it) is a new feature that has been recently added to the Orkut system and will ensure that you get scraps only from the people you trust i.e. friends and family etc. This will block all unwanted scraps in your scrapbook from people who usually used to spam you or irritate you for no reason. The new great feature will make sure that you don't get links to any malicious scripts and websites and will also prevent unknown people from writing something abusive or unethical on your scrapbook.

Follow the simple little steps to set up the "Friends and Friends Only Scraps" Feature

  1. Open Orkut Privacy Settings
  2. See the third row which says "allow scraps to be written by"
  3. In the drop down menu select "Friends"
  4. Save changes and You are done

orkut-privacy-setting.png

That should do the trick :) now you can happily and safely use Orkut without the fear of getting hacked or getting vulgar/unwanted scraps in your scrapbook.

Backup and Restore Firefox Profiles Easily

Transferring a Firefox profile from one computer to another can be a pain if you have to do it manually. Sure, you can locate the firefox profile directory and then copy it to the new machine, but then it doesn't automatically show up in the list, etc.

A much easier method for backing up and restoring profiles is to just use the MozBackup application to backup and restore the profiles to a single backup file.

When you launch the application, you can choose to either backup or restore the profile. You can choose which profile to back up, and what file to save it as.

You can restore the profile on another computer by simply launching the MozBackup application on that computer, and then selecting the profile to restore to, and chosing the backup file that you copied from the first computer:

It's really as simple as that.

Download MozBackup

Network Magic

Network Magic will automatically setup your network, enable file sharing and make you printer available on every computer on the network.

Network Magic Review

I receive a lot of emails from people telling me that even though they followed my step by step tutorials they couldnt get their network to work. There are a lot of problems one could encounter when trying to setup a network or share resources between two computers  and unfortunately I do not have the time to assist each and every one of you. You can either try to figure out what’s wrong by yourself (post on forums, ask your friends etc) or you could use Network Magic.

Network Magic is one of those programs that make a difficult task look like a child's play. Here are some of the things that Network Magic can do for you:
Note that all of the tasks bellow are done automatically by Network Magic.

  • set up your network
  • configure your printer so that you can print from any computer
  • enable file and folder sharing
  • diagnose and repair internet connection problems

Setup you network and enable file sharing with just 2 clicks!

Yes, it’s true: with just 2 clicks you can have your network setup and you’re going to be able to share files between 2 or more computers:

  1. When you start Network Magic for the first time, you will be prompted to choose a name for your computer. Choose a name and click Next
    Choose a computer name
  2. Choose which folders you want to share, click Next, and let Network Magic do its job. You’re DONE
    Choose which folders to share

Who should use Network Magic

You may be asking yourself “I already know how to do these things. Why should I need Network Magic”? If you already know how to properly setup a network (one that actually works), you don’t need this software, although you may be interested in the program’s other features (see here) . But if you have no idea how to make a network, already tried to setup a network but did not succeed or you just don’t want to do it by yourself , Network Magic is your friend. Download Now.

Other features:

As we’ve already seen, Network Magic will not only setup you network and printer but will also identify and fix any problems. But there are more tasks you can accomplish with this great software:

  • Daily Internet use report
  • Ability to connect Windows ME/2000/Xp/Vista and Mac OS devices
  • Comprehensive network map, including non-Windows computers
  • WiFi hotspot connection manager and automatic protection of files at these hotspots, as well as wireless intruder detection
  • Health and security alerts for all computers from a single one and detailed information about the status of your networked devices
  • Easy to set up and use remote web access to your shared files

Conclusion

Have trouble with your network? Use Network Magic. It’s as simple as that. I should also warn you that Network Magic doesn’t come free. The good news is you get a free 30 days trial and you get to play with the Premium version's features. So go ahead, try it out, and if you decide that Network Magic is the software for you, be wise and purchase the Premium.