Format: Software | Size: 25,794KB | Date: Feb 2008 | Version: 1.2.1 | System Requirements: Windows 2000/XP/Vista, DirectX 9.0 drivers | License: Free

|
|
|
Knowledge is Free
Format: Software | Size: 25,794KB | Date: Feb 2008 | Version: 1.2.1 | System Requirements: Windows 2000/XP/Vista, DirectX 9.0 drivers | License: Free

|
|
|
Search Date Range with the Keyboard
If you are a keyboard junkie, you can easily select a date range by using the following syntax in the search box in any folder:
modified:2/1/2008 .. 2/20/2008
The key is the two periods between the dates, which tells the search engine to use it as a range. You could use "Datecreated" instead of "modified", or just "date" if you wanted to.

If you want to change the search to also use keywords as well, you can use the name: parameter like this:
name:xls modified:2/1/2008..2/20/2008
It's quite powerful once you get used to it.
Select Date Range with the Mouse
If you aren't a keyboard junkie you probably don't want to remember the exact syntax you need to type in, but don't fear - we've got another way to do it. Just open up Advanced search by hitting the F3 key with an Explorer window open (or if you are using Vista pre-SP1 you can use the Search option on the start menu)
Now change the Date drop-down to "Date Modified" and then "is", then pop up the date range box…

Once you have the date range box open, you can just click the first date and drag the mouse to select more dates.

You can even click on the month to select the whole month, or even select multiple months. The key thing is that once you've got the selection how you want it, you need to click somewhere else… it's slightly tricky until you get used to it.
Of course you'll have the best luck if you also put in a filename into the Name box, and select the right folder location to search in.
Msconfig is a standard system tool in Windows where users can, among other things, disable startup items. It's a great tool if you do not have any other software like Autoruns or Starter in reach that deal with startup programs more efficiently. If you use Msconfig all the time you will notice that deactivated entries will not disappear and that there is no way to delete them permanently from being displayed in the tool.
It would be possible to delete the entry in the Registry because the Registry key where it is located is displayed in Msconfig. If you do not want to fiddle around with your Registry you could use the Msconfig Cleanup Utility which displays all inactive startup entries in Msconfig.
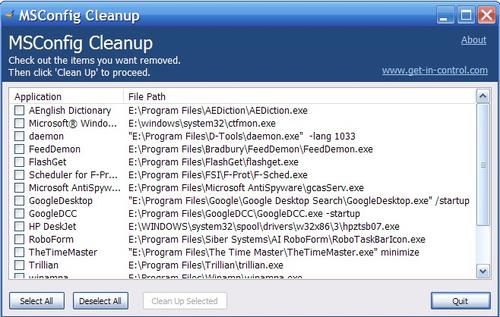
Just check some or all of the entries that you want to permanently remove from the Msconfig dialog.
Remote Differential Compression (RDC) allows data to be synchronized with a remote source using compression techniques to minimize the amount of data sent across the network.
Many pre-Windows Vista computers and devices are not compatible with RDC which makes transferring files across a network slower for a Windows Visa computer because it's trying to use RDC.
This guide shows you how to speed up your Windows Vista network transfer by disabling Remote Differential Compression (RDC) in Windows Vista.
This guide shows you how to increase Internet Explorer 7's connection limit from 2 to 16 which increases the speed of many web pages.
When you connect to a website your computer establishes connections with the web server(s). One connection might be a graphics server, another connection may be an ad server and so on. Once the connection has received what it asked for it is disconnected and used for something else.
By default IE7 is set to only be able to open 2 or 4 connections at a time. If you have broadband and you use tabs in IE7 or you visit sites that use lots of connections this tweak will increase the speed of IE7 a little.
You might be wondering "Why don't they just set IE7 to use 16 connections by default instead of 2?" If everyone who uses IE would use 16 connections it would slow down the internet. The low number of connections set by default is like a throttle being held back so the internet doesn't slow down and to keep web servers from getting bogged down from many connections by only a few users.
Download and install this registry key.
If you don't want to download and run the registry key above (I don't blame you), you can create your own. Open notepad and paste the code below in it.
Windows Registry Editor Version 5.00
[HKEY_CURRENT_USER\Software\Microsoft\Windows\CurrentVersion\Internet Settings]
"MaxConnectionsPerServer"=dword:00000010
"MaxConnectionsPer1_0Server"=dword:0000010
Save the file by clicking save as, change Save as type to All Files, name the file something like ieregedit.reg. Don't forget to add .reg to the file to make it a registry key.
Please note: This regkey works on IE5+ and all versions of Windows.
Don't expect your internet speed to double or anything like that. This tweak will make most advanced sites load a little quicker. If you're using tabs this tweak will let IE7 load multiple tabs quicker also.
The "Previous Versions" feature in Windows Vista is a major step forward for users, since it provides some built-in protection against losing important files. The problem is that the home versions of Vista don't give you an interface to access them, even though it's enabled by default!
Enter ShadowExplorer, a utility that runs on all versions of Vista and will let you access your "Shadow Copies", which are the internal backup copies of files that Vista stores every so often.
Recovering Files with Shadow Explorer
First launch ShadowExplorer as administrator by right-clicking on the entry in the start menu and choosing Run as Administrator. (Update:It should launch as administrator by default otherwise, but if it doesn't then use the right-click method)

The initial screen will show you a drop-down menu with the shadow copies of all partitions and disks you have.
Click on the last shadow (see the date) from THE DAY BEFORE the unfortunate event happened - make sure you get the right partition (most likely C: for your own files)

Since most of your files are in your User folder, double click C:\ then in the left pane choose "Users".

Then in the right pane double click the folder with YOUR NAME ( probably the last folder before desktop.ini). There you will find all your folders (and some more)

Now you can right-click on the folder or file you want to recover and EXPORT it to wherever you like on your system.

After clicking on Export, you'll be prompted for the directory you'd like to save the recovered files into.

Note that the Shadow Copies / Previous Versions feature is not a substitute for a proper backup solution, but can greatly help in a pinch.
If you are using Firefox, then you have noticed that whenever you use its Searchbox to find anything, it opens the results in the existing tab and hence it overwrites the contents. Its quite irritating and we always have to open a new tab to make search.
Here is a solution for this problem. After following this trick, your search results will open in a new tab:
Type about:config in Firefox addressbar and press Enter.
Now type browser.search.open in Filter box.
Now you'll get browser.search.openintab in results. Double click on it and its value will be changed to true.
If you are using Windows Server 2003 or 2008 then you have noticed that whenever you click on Shutdown button, it shows a dialog box asking for the reason. You have to select the option from drop-down box or write into Comment box to shutdown the system.
Many ppl find it annoying and want to remove it but they don't know the method to remove it. Here I'll tell you a simple way to completely remove this annoying dialog box:
Type gpedit.msc in RUN dialog box and press Enter.
It'll open Group Policy Editor. Now expand:
Computer Configuration -> Administrative Templates -> System
In right-side pane, look for "Display Shutdown Event Tracker" option.
Now double-click on "Display Shutdown Event Tracker" and select "Not Configured" or "Disabled". Now Apply it and the annoying dialog box will disappear.
NOTE: You can also use this method to enable Shutdown Event Tracker in Windows client OS like Windows XP, Vista, etc. Just set the option value to "Enabled".
Windows Vista includes a "Share" button on the explorer toolbar, but it doesn't work the way people used to XP/Win2k expect it to. Instead it pops up a wizard to make things "easier".

By default, this share button will not let you choose the name of the shared folder. Even more annoying, sharing a folder within your user directory will have a weird share name like \\computer\Users\geek\Contacts, which is much more difficult to remember.
If you want to share folders the way you used to on Windows XP, simply right-click the folder, and choose the Properties option.

Now choose the Advanced Sharing button.

Now you should be able to check the box "Share this folder", and choose a share name, which will be accessible from \\computer\myshare, for example.

You can also click the Permissions button if you want to allow write access to this share, or allow access to only a particular user.

By default Windows hides WEP and WPA keys stored on your PC to connect to various Wi-Fi networks, but freeware utility WirelessKeyView lists them for you. When you've forgotten that Wi-Fi network key, run WirelessKeyView to see all the networks your Windows PC has ever connected to using its default Wireless Zero Configuration mechanism. This utility doesn't reveal keys stored by third-party network connection software. Delete keys from old networks that you no longer need, and easily copy keys to the clipboard to send or save. WirelessKeyView is a free download for Windows XP and Vista. Click here to download WirelessKeyView.
To check your disk manually
Start> Run (or press Windows-R) to open the command line, type cmd.exe /c echo y|chkdsk c: /f /x, and press Enter

To automate disk checking in XP,
Start> All Programs > Accessories> System Tools > Scheduled Tasks.

Double-click Add Scheduled Task to start the Scheduled Task Wizard,
Click Next.
In the Application list, select Command Prompt and click Next.
If you don't see an entry for Command Prompt in the list, click Browse, find and select the file 'cmd.exe' in Windows' System32 folder, and click Open.
Choose a time interval (Monthly is a good choice) and click Next. Specify the time, day, and months

Click Next
Enter the account name and password that you use for logging in.
Click Next
Check Open advanced properties for this task
Click Finish.
With the Task tab selected, edit the text in the Run box so that it reads c:\windows\system32\cmd.exe /c echo y|chkdsk c: /f /x (your path and options may differ). Click OK, and enter your account name and password again.
Finally, click OK one more time
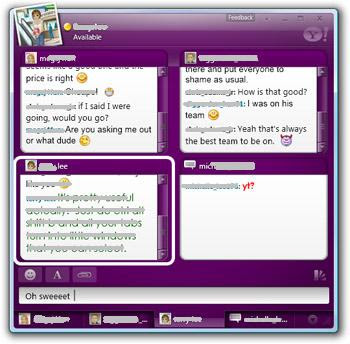
 Did you know that therewas a Hidden Matrix mode in Yahoo Messenger when you use it over Windows Vista Well, even I wasn't aware of it until I recently read a report about the same at Yahoo's Blog.
Windows Live SkyDrive, the online storage service of Microsoft, has left beta status today and is now available for users in 38 countries including the United States, Canada and Great Britain. The limit of 500 Megabytes per user account has been raised to a maximum of 5 Gigabytes which comes closer to services like Aol Xdrive and even Google Gmail.
I'm not able to test the service yet because my country is not yet in the list of supported countries. The maximum file size seems to be 50 Megabytes which should be enough for most users if you consider that the file size limit is 20 Megabytes at Gmail for instance.
Windows Live Sky Drive is firmly integrated into several other Live services of Microsoft. Live Messenger users are for example notified if one of their contacts added a new file to their list of shared files.
It would be nice if someone who is able to join the service would comment on his experience with it.
How-to set up Windows Update for Windows Vista to update other programs and services like Microsoft Office and Windows Defender along with Windows updates.
By default Windows Update for Windows Vista only delivers updates for the Windows Vista operating system. Did you know that you can set up Windows Updated for Windows Vista to deliver updates for other Microsoft products and services other than Windows Vista?
This is a great feature to keep Microsoft Office, Windows Defender, and other Microsoft products up-to-date effortlessly.
Here's a list of supported products and services Windows Update for Windows Vista can be set to deliver:
* Microsoft Office System
* MSN
* Windows Defender
* Microsoft SQL Server
* Microsoft Exchange Server
* Microsoft Visual Studio
* Microsoft Internet Security and Acceleration Server
* Microsoft Data Protection Manager
Set Windows Update to Get Updates For More Products
1. Click the Start orb, All Programs, and then select Windows Update.
2. Click Get updates for more products located at the bottom of the Windows Update window.
3. You'll be taken to a website where you must accept their terms of service and then download and install an add-on for Windows Updated that enables it to deliver updates to more programs and services.
4. When the add-on is installed Windows Update will be restarted and it will check for updates.
From now on Windows Update will update Windows Vista and supported software and services listed above.
If you have multiple users on your network domain and want to give a user administrator rights you need to add them to the Admin user group. The process is relatively simple, here is how.
First you need to make sure you're logging in as Administrator or a profile on the domain which has Admin rights. Go to Start \ Run and type in "compmgmt.msc" (without the quotes) and click OK.

This opens the Computer Management screen where you want to expand Local Users and Groups, click on Groups, then double click Administrators on in the right hand side.

In the Administrators Properties window click the Add button.

Since this example is on a domain usually just typing in the users first name and last initial into the object names box … then click on Check Names and the name will be retrieved from the domain and will be underlined. Then just click OK. If you are not able to locate the user most likely they have not been added to Active Directory yet.

A visitor was asking me a while ago if there were really download managers for websites like Rapidshare and I simply told him at that time that they would exist. JDownloader is a Rapidshare Download Manager that comes with a lot of functions to make downloading files from Rapidshare and dozens other file hosting websites a breeze.
The download manager has several benefits over manually downloading files from Rapidshare. The first is that you can simply add as many download links to it which will all be stored and processed one after the other. The image verification is filled in automatically by JDownloader which means that you can keep it running in the background all the time without having to actively manage the downloads.
Download links can be automatically added by making Jdownloader observe the clipboard. It offers a reconnect feature which has to be configured, an unpacker, a password list, selecting a favored server from each hoster and much more. There are several options that need some explanation though before you can start using it.
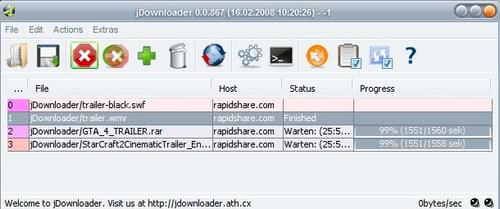
You should first realize that JDownloader needs Java, so make sure that is installed. After unpacking the application you need to execute the file JDownloader.jar to start the installation where you select a download location for the files. Files will be automatically updated during the setup as well.
Before you start to begin downloading files you need to accept the Terms of Service for all file hosters that you want to download from. Open the options, click on Hosts in there and check the TOS of the file hosters.
The language can be set to German and English but even if you select English it looks like a mix of German and English. Not to hard to figure out stuff because the most important elements are well translated.
The backup utility was introduced to help you make copies of the data found on your hard drive in the event of data loss due to hard disk failures, accidental deletion and any other misfortune that may happen.
You can run the utility from two locations:
Both have pretty much the same options, the only difference being how they are displayed.
Back up files will create backup copies of your files and folders. In the Backup Status and Configuration click on Set Up Automatic File backup.In the next window select which drive you want to copy your backup on. The wizard tells you how much space you need for your backup, so be sure you have some available. Note that you cannot save your backups on the same partition on which Vista is installed.

So you login to your computer every single day, but there's more than one account to choose from… either because you got the computer from somebody else, or some software package added a user account that you really don't want to see. So how do we hide that other account from the login screen?
There's a simple registry hack that you can do to hide accounts from the login screen, or you could alternatively delete the user account if you really don't need it. Both methods are listed below.

Manual Registry Hack
Open up regedit.exe through the start menu Run box, and then navigate down to the following key:
HKEY_LOCAL_MACHINE\SOFTWARE\Microsoft\Windows NT\
CurrentVersion\Winlogon\SpecialAccounts\UserList
On the right-hand side you'll see a list of keys that correspond to user accounts that are considered "Special" and are not to be shown on the login screen.

Create a new DWORD value with the same name as the user name that you want to hide. You'll note that the actual username in the illustration was "OtherPerson" and not the description that was shown on the login screen.
To unhide the account, simply delete the registry key that you created.

The next time you log off you'll see that the other account is gone.
Hide User Account with Tweak UI
You can also use the Microsoft Tweak UI PowerToy to do the same thing. (Thanks to Gustav for reminding me to include this)

Just click on the Logon key in the left hand side, and then uncheck the box for "Show <username> on Welcome screen"
Login to Hidden Account
You can still login to the account even though it's not shown… You'll just have to use a little trick.
At the login screen, just hit the Ctrl+Alt+Delete combination twice in a row, and you'll be presented with the old-school login screen, where you have to manually enter the username.

Type the name and password of the other user, and login.
Delete User Account
Alternatively you can always delete the user account if you are absolutely sure that you don't need that user account anymore. Right-click on "My Computer" and choose "Manage"

Navigate down through "Local Users and Groups" and then Users, and then locate the username in the list that you'd like to get rid of.

Just right-click and choose Delete. Note that this step cannot be reversed, so make sure you only delete accounts you really really don't want anymore. If you are unsure, you can just hide them using the first option above.
HD Tune is a hard disk analyzer that offers a wealth of information about the internal hard drives that are connected to the computer. It does display general information like the type of the hard drive, the serial number, capacity, firmware version and buffer size which are nice to know because it allows you to check if that hard drive is the correct one. I remember more than one instance where a friend of mine bought a hard drive only to find out that the clerk handed him one that had a lower capacity and different model number.
Far more interesting is the information about the supported and active transfer mode. If the active transfer mode does not equal the supported one you need to check on that because your hard drives are not running at top speeds then. A list of supported features of the hard drive is also shown which give you a wealth of information as well.
The temperature of the hard drive is shown in the program window as well and in the system tray so that you can react if it should rise to a level that the manufacturer deemed risky. If that is the case you need to check on the cooling system of the computer and probably add another fan to it.
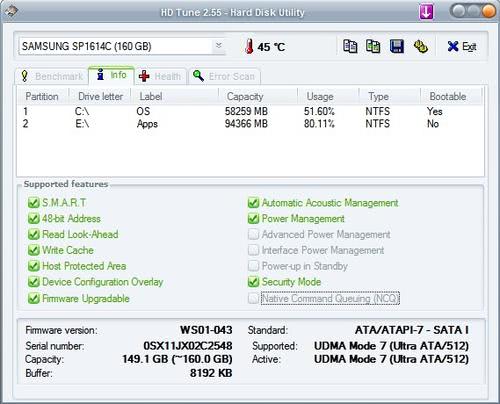
Hd Tune has a separate health tab that checks several variables and displays their status. If something does not look right in this menu you should definitely consider backing up all important data and consider purchasing a new hard drive.
Two scans are available. The first is a simply benchmark that tests the read and write speed of the drive while the second is an error scan that lets you know if sectors on the hard drive are damaged.
I would not run HD Tune all the time but every now and then to check on the hard drives. It's a good feeling to know that everything is alright.
Locate is one of the fastest ways to search for files and content in files in Windows. It uses a file database which is created once at first run and then updated regularly to reflect the changes to the system. The initial scan takes a few minutes while the updates usually finish in a matter of seconds.
I did mention Locate before here at Ghacks and thought that this awesome program deserves another article. The software developer is constantly working on Locate and he has added several new functions since the last time that I wrote a review about it. The biggest change in this new version of Locate is the Find as you type function. Locate does not wait anymore until the user presses the submit button to find files or text in files but presents results immediately.
You can still filter results in so many ways that it would take ten articles to explain all the options. It is possible to filter by file size, file date, extension and file path for instance. Normal file searches take about a second before all results are displayed, it takes a bit longer to search for content in files naturally but it is fast as well if you consider that all files on all hard drives can be searched.
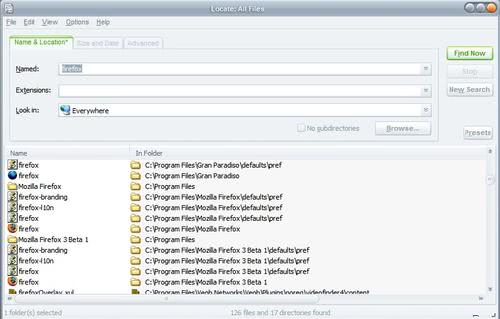
I would suggest to schedule daily updates for Locate if you have the intention to use it regularly. You can either configure this option in Locate but the application has to be running to start the file update process on its own or you can use the task scheduler of Windows to update the Locate database regularly.
Do you spend a lot of your time in Gmail? If it's your main e-mail client, you probably do. Market research shows that the average worker spends nearly two hours a day working on e-mail. Learning to search effectively in Gmail can save you quite a bit of time, and you would expect Google to make the search robust in its e-mail client, which it is. In this post, I'll round up several ways to become much more efficient at it.

Use parentheses to narrow down to the messages you want. If you've sent 100 messages back-and-forth with other people about Florida, and the ones you want to review pertain to Jacksonville, enter Florida (Jacksonville) to get rid of the Florida-related messages you don't want.
Use multiple terms within parentheses. With regard to the tip above, if you want to see all messages pertaining to Jacksonville and Miami and Florida, enter Florida (Jacksonville and Miami).
Isolate messages from one sender by using his/her e-mail address. You can see all messages from any sender by simply typing his or her e-mail address in the search field.
Searching for messages sent within a given time frame. You can search for messages sent between two dates. For example, if I want to find all messages sent after February 4th of this year but before February 11th the syntax I'll enter in the search bar is: after:08/02/04 before:08/02/11.
Combine the above two tips. Use a person's e-mail address and the before/after syntax above to search for all messages the person sent between two dates.
Use the Show Search Options drop-down. Right next to Gmail's search field, there's a link called Show Search Options. Click it to input advanced search options of several kinds.
Use query words. Google has a complete table of Gmail query words you can use to help drill down to exactly what you want.
Find attachments fast. When you need a message that had an important attachment from, say, Ben, type from:Ben has:attachment.
Use Quick Find. Hit the forward slash key on your keyboard to pop a Quick Find box at the bottom of your screen which lets you jump to any particular word(s) on the page you're looking at.
Use filters. While learning to search well in Gmail is essential, you can save a lot of time with a little advanced planning by learning to use filters. These help keep your Inbox uncluttered.
 I know that the cool thing about Windows Operating System is that you can manage multiple programs and applications in separate windows and you can open as many windows as you like, simultaneously.
But there are situations in which you might be working on a lot of things together (for example, you are listening to the music, surfing the web, chatting on your favorite IM and etc) and suddenly you close a window by accident or by confusion.
Gonein60s is a little utility that will allow you to instantly recover any applications that you might have closed in haste or by accident.
Whenever you close an application by using the ALT+F4 combination or by pressing the Red X button, Gonein60s saves the application in the RAM for some additional seconds thus allowing you to recover any window within a given frame of time.
This utility allows you to customize the time for which you want to save the closed applications in the RAM plus it has an ignore list which will ignore applications even after they are closed and won't allow you to recover them. Checking "Kill Windows" prevents this utility from saving changed documents.
It is really a lightweight application which can be very useful for users who prefer multi-tasting.

Making your Gtalk as an online FM streaming device is not a complicated task but a simple 3 step process as 123. With the help of a third party service called Gtalk 2 Voip we could attain this functionality.
What is Gtalk 2 Voip ?
GTalk2VoIP is a free and publicly open voice gateway for major Instant Messenger clients. It makes possible voice interoperability between Google Talk, MSN/Live Messenger, Yahoo! Messenger and SIP phones without any additional software installation.
How can I hear FM in Gtalk?
Teen Taal 110 a hindi Fm station which aims at delivering new hindi songs can now be heard right away from your google talk.
All you have to do is to follow the steps below:
The first step of adding id would make you register the gtalk2voip service!
Other features of Gtalk2Voip:
How it works?
Some of the services I mentioned above may be chargeable while they offer free incoming calls from sip phones to your gtalk, incoming call from PSTN to your gtalk, making calls to other IMs etc.
So now you get a free incoming SIP number, PSTN access number for Gtalk etc which you can add on to build your business widely.
Gtalk 2 voip also provides support for mobile platform with their specially designed application called Talkonaut which helps them to access and enjoy their voip services from their handheld.
Register now: Gtalk2Voip |
Presenting Driver Magician, a must-have utility for everyone using Windows. I'll present a scenario where you need to re-install windows for a lot of reasons…then before doing that you remember…Oh, I think I lost my sound card's drivers CD…but it's installed…That is when Driver Magician comes into party.
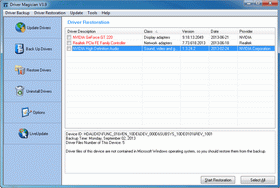 Driver Magician offers a professional solution for device drivers backup, restoration, update and removal in Windows operating system. It identifies all the hardware in the system, extracts their associated drivers from the hard disk and backs them up to a location of your choice.
Then when you format and reinstall/upgrade your operating system, you can restore all the "saved" drivers just as if you had the original driver diskettes in your hands. After one system reboot, your PC will be loaded and running with the required hardware drivers.
Cool, isn't it? Also Driver Magician has a built in database of the latest drivers and can update the list through internet thus saving a lot of time in finding the appropriate drivers for your hardware.
Features:
System Requirements:

I bet most of you would have seen the Bluescreen Windows Error which comes up whenever something unexpected happens but probably most of you did not know that it is called the Blue Screen of Death. It usually comes around after encountering a critical system error which can cause the system to shut down to prevent damage.
Bluescreens can be caused by poorly written device drivers, faulty memory, a corrupt registry, an incompatible Dynamic-link library (DLL), or the computer overheating.
After encountering such a Bluescreen error, most non-tech savvy computer users give up and assume that a serious issue has corrupted Windows and thus it needs a reinstall. However that is not the case mostly and Windows can be recovered into its original state by performing a little tweak called the Disk Checkup.
Requirements
Whenever you experience such a Bluescreen error and after many tries you see that Windows is not starting up you can perform a disk checkup following the steps below:
After this your Windows should work fine and properly.
Note: This tip intends to help you recover a corrupted Windows XP and does not tell you how to repair your Windows XP installation. There is difference in in "recovering" and "repairing" when we are dealing with Windows OS.
If you bought your computer with Windows Vista pre-installed, you most likely don't have a regular Windows Vista repair disc. What you do have is some crappy disc from the manufacturer that totally wipes your computer back to factory settings. What if you just want to run Startup repair off the Vista install cd without losing all your settings?
It turns out that Microsoft is going to let you create your own Vista repair disc when Service Pack 1 comes out in a month or so. If you can't wait that long, the nice people over at Neosmart have created their own Vista Repair Disc available for download. (32-bit only)
The file is an ISO image file… if you are familiar then skip to the link, otherwise we've also got instructions on how to create a CD from the ISO file.
Burn Vista Recovery Disc ISO to CD
You may already have a tool to do this such as Nero, but the best tool available for burning ISOs is ImgBurn, a freeware utility that does nothing else but burn ISO images, and it does it well.
Open up ImgBurn, and then click on the "Browse for a file" button, selecting the file you downloaded from Neosmart.

Put a blank CD into the drive, and then click the big Write button.

That's about all there is to it… you now have your very own Vista Recovery CD.
If your Windows Vista computer has encountered the dreaded "BOOTMGR is missing" error, you aren't alone. If the problem isn't hardware related you can fix it with relative ease as long as you have a Windows Vista DVD handy.

Boot off the Windows Vista DVD and then click Next at the first prompt:

You should see a link in the lower left-hand side for "Repair your computer"

The installation process will attempt to find your Vista installation directory. If there's more than one in the list, select the correct one and then use the Next button again.

Click the first link for "Startup Repair"

The installation process will repair the system, and then prompt for you to reboot.

Alternatively you could have chosen the Command Prompt option instead, and use the following command to fix the boot options only:
bootrec /fixboot

Copyright © 2007 - Knowledge is Free - is proudly powered by Blogger
Illacrimo - Design of Design Disease
- To blogger by Blog and Web